Onirix Screen Capture
This documentation offers you the possibility to easily add photo and video recording functionalities to your experiences. This is perfect for encouraging engagement by capturing images and sharing them on social networks.
With our library you will be able to include in your experiences:
- Taking screenshots of users interacting with the experience.
- Preview and share the user's images in the experience.
- Record videos
Starting point:
In this tutorial we will show you how to add controls for capturing images and recording videos. We will also show you how easy it is to change the default appearance and texts.
Advanced options
If you need a higher level of control or want to use your own user interface we will show you how to use the library without our UI.
You should keep in mind that using this library ONLY with WebXR may generate a loss of performance and a white strip will also appear at the top of the navigation bar with your phone. Both issues are generated by Google and cannot be hidden or improved in any way.
Here we go!
Complete example in our experience library
Before we start, it is important to know that we have a complete example of this functionality in our experience library. With this example you can download the content and see the code of the experience.

In this case you can place a 3D model of Elsa from Frozen on any surface, and take a picture with her. Access here to our experience library example screenshot with Elsa.
DYI: Onirix Screen Capture screens
First of all lets take a look to the Onirix Scree Capture screens and remember that you can customize all of then.
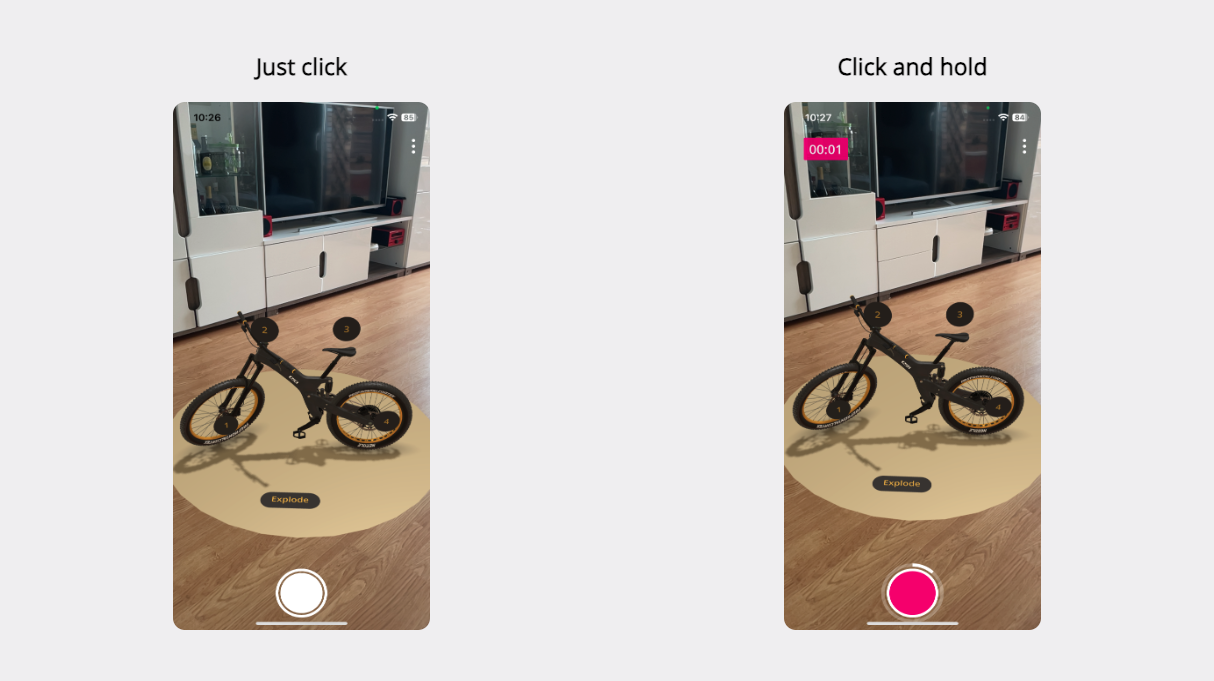
Default UI controls
A very simple interface! A single button to capture or to start and stop video recording. Just click to take a picture or click and hold the button to record a video of the experience.
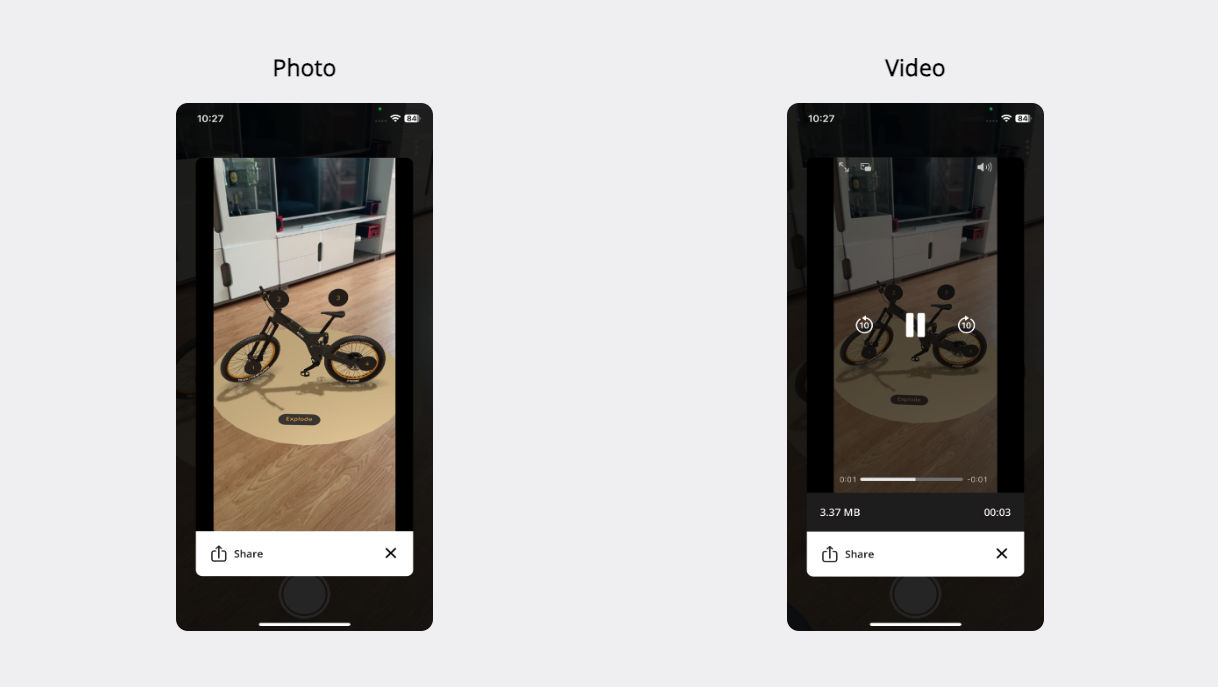
Preview component
If we are taking images or videos we will be able to preview them immediately in the experience itself. In addition, this component has options for the user to download or share it in networks (only if the browser is compatible).
In Safari the downloading of the image or video must be done through the sharing options provided by the iOS operating system. In this browser the option to download the content behaves differently from other browsers as it loads the image or video in the open tab eliminating the experience.
Step 1: Use the default UI
Onirix Screen Capture uses Onirix Embed SDK to communicate with the experience. Therefore it is necessary to import and instantiate Onirix Embed SDK before using Onirix Screen Capture.
Once you have added the Onirix Embed SDK you just need to instantiate Onirix Screen Capture and call the addUI method.
import OnirixEmbedSDK from "https://cdn.jsdelivr.net/npm/@onirix/embed-sdk@1.18.1/+esm";
import OxScreenCaptureLib from "https://cdn.jsdelivr.net/npm/@onirix/screen-capture@2.0.0/+esm";

const embedSDK = new OnirixEmbedSDK();
embedSDK.connect();

const oxScreenCapture = new OxScreenCaptureLib(embedSDK);

embedSDK.subscribe(OnirixEmbedSDK.Events.SCENE_LOAD_END, (params) => {
   oxScreenCapture.init();
});
With this code you will be able to take screenshots or videos and display them directly in the preview component.
But the ìnit method allows you to do more things. This method supports four parameters: photoMode, videoMode, preview, uiTexts, maxVideoLength:
- photoMode: enables the screenshot functionality, by default it is true.
- videoMode: enables the video recording functionality, by default it is true.
- preview: If you want to show a preview component after screenshot/recording, you must pass the preview parameter as true. By default it is true.
- uiTexts: If you want to customize the texts of the buttons, you must pass a JSON object with the texts you want to change. By default it is null. Take a look at the section on how to particularize the default ui.
- maxVideoLength: determines the maximum length of the video that the user can record. If this parameter is not set, the duration will be 15 seconds. Remember that the longer the video, the more device resources will be needed.
Let's see some examples:
// Default config: take screenshot, video and show preview component.
oxScreenCapture.init();
// Take screenshot, no video and no preview.
oxScreenCapture.init(true, false, false);// Take video (10 seconds max), no photo.
oxScreenCapture.init(false, true, true, null, 10);// Record video and customize texts, no screenshot.
oxScreenCapture.init(false, true, false, {
share: 'Send or download video',
preparing: 'Loading...',
});Step 2: Customize default UI
Customizing texts
When you use the default UI these are the texts that will be shown to the user:
| Text | Description |
|---|---|
| share | Text of the button that opens the share menu of the navigator |
| preparing | Text to indicate that the video is being processed. It is shown on the preview component before enabling share and download options. |
| video_prefix | Prefix for the video file name |
| photo_prefix | Prefix for the photo file name |
If you want to change any of these texts, you must pass a JSON object with the texts you want to change.
const CUSTOM_UI_TEXTS = {
    share: 'Send',
    preparing: 'Processing...',
    video_prefix: 'recording_',
    photo_prefix: 'picture_',
};

oxScreenCapture.init(true, true, true, CUSTOM_UI_TEXTS);
Customizing CSS
The body has a css class called ox-screen-capture. And during screen capture or video recording the class ox-screen-capture--in--progress is added.
Default UI has ox-screen-capture__ui and the preview has a class called ox-screen-capture__preview. By employing these selectors, you will be able to customize the style of individual elements under them in the DOM.
To modify the look and feel of the UI controls and preview component you can add all the CSS you need to your experience through Onirix Studio's online code editor.
You can make infinite changes to the interface by adding the appropriate CSS selectors. Through your browser's development tools you can explore the names of the css classes used by the library and add your own custom selectors and rules.
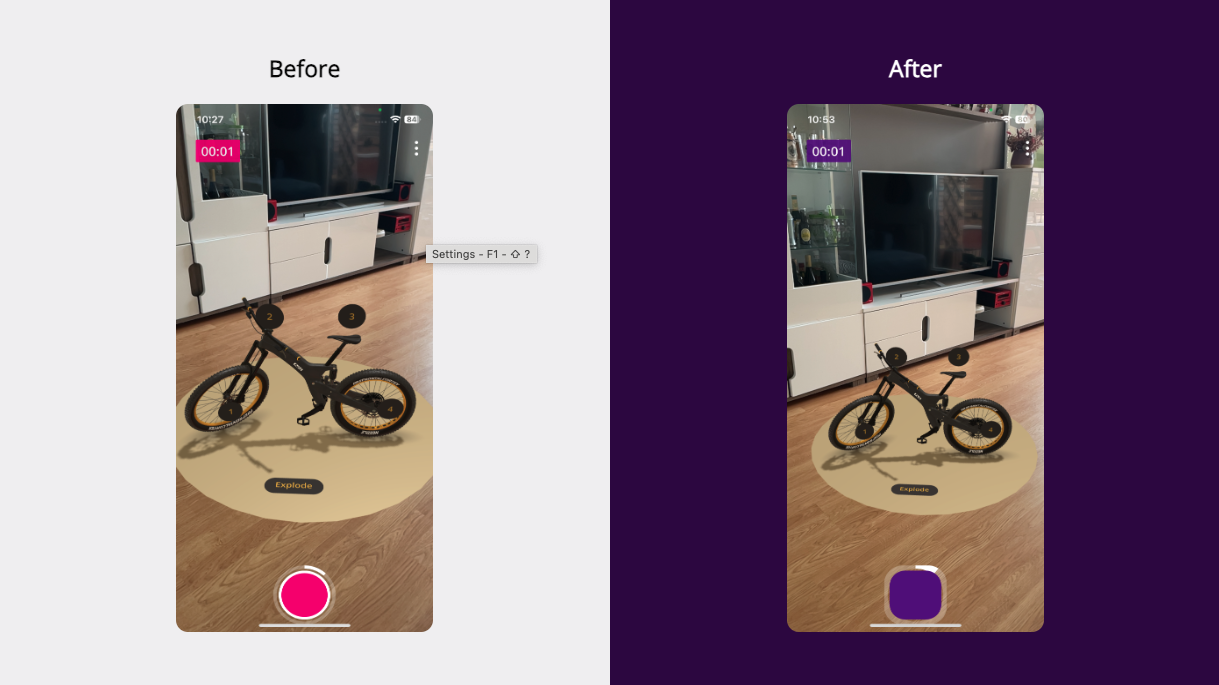
Customize trigger component
Let's change a few things in the trigger component:
body.ox-screen-capture .ox-screen-capture__ui .ox-screen-capture__trigger--progress{
    border-radius: 30%;
    background: conic-gradient(
        rgba(88, 0, 136, 1) 0%,
        rgba(88, 0, 136, 1) 0%,
        rgba(88, 0, 136, 0.26) 0%,
        rgba(88, 0, 136, 0.26) 100%
    );

    mask: radial-gradient(
        transparent 63%,
        black 63%
    );
    -webkit-mask: radial-gradient(
        transparent 63%,
        black 63%
    );
}

body.ox-screen-capture .ox-screen-capture__ui .ox-screen-capture__trigger {
    border-radius: 30%;
    background-color: #580088;
}

body.ox-screen-capture .ox-screen-capture__ui .ox-screen-capture__trigger:after {
    border-radius: 30%;
    border: solid 4px #580088;
}
You can also customize the timer:
body.ox-screen-capture .ox-screen-capture__counter {
    background-color: #580088 !important;
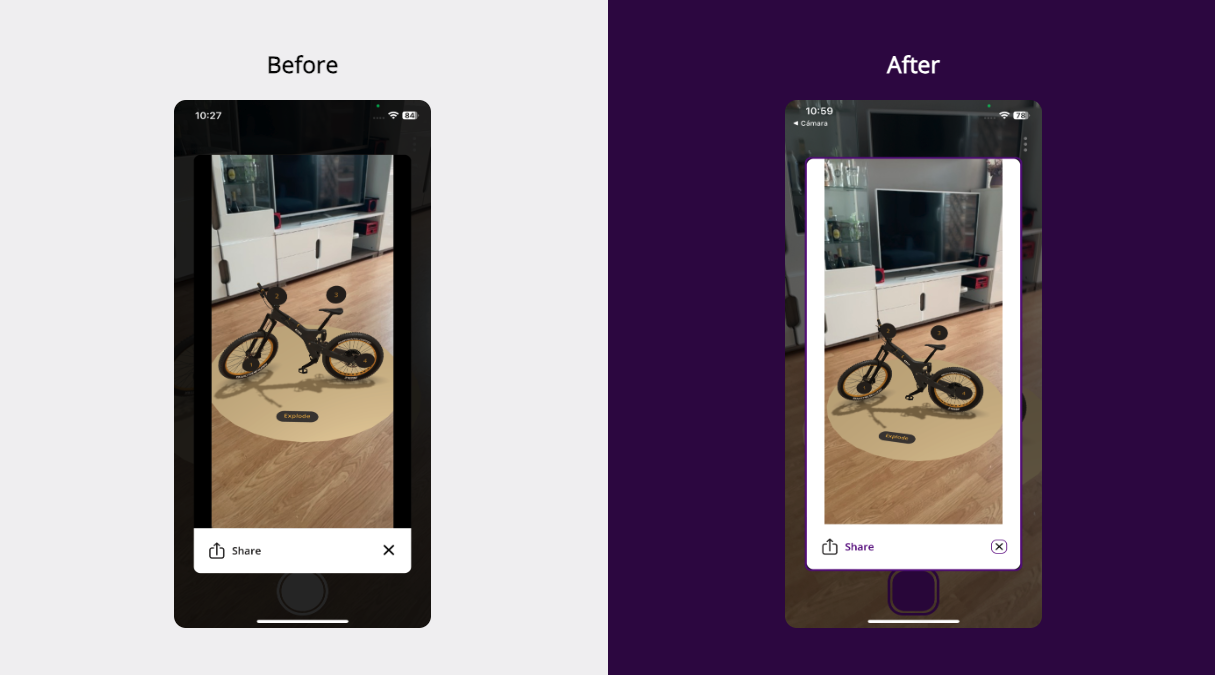
}Customize preview component
Let's change a few things in the preview component:
body.ox-screen-capture .ox-screen-capture__preview > div div > button {
    border-radius: 8px;
    border: 1px solid #580088;
    background-size: 50%;
    background-position: center center;
    width: 22px;
    height: 22px;
}

body.ox-screen-capture .ox-screen-capture__preview {
    background-color: rgba(0, 0, 0, 0.5);
}

body.ox-screen-capture .ox-screen-capture__preview > div > div {
    background-color: #FFF;
}

body.ox-screen-capture .ox-screen-capture__preview > div{
    border: 3px solid #580088;
}

body.ox-screen-capture .ox-screen-capture__preview-share span:last-child {
    color: #580088 !important;
}Step 3: Create your own controls.
Onirix Screen Capture also allows you to directly call the functions that allow you to take screenshots and record videos. These are the following:
Take screenshot method
capturePhoto();This method takes a screenshot of the experience and download a file with the image.
Take screenshot method with preview
capturePhotoPreview();This method takes a screenshot of the experience and displays it in a preview popup with save and share options.
Start video recording method
captureVideoStart();This method starts the screen recording.
Stop video recording method
captureVideoEnd(preview = true);This method finish the screen recording and download the video. If preview is true the video will be loaded into preview component.
Remove default UI
Remove the default UI from document.
removeUI()Remove preview component
Remove the preview component if exists.
removePreview()Example of custom UI
Through Onirix Studio's online code editor we will add a few html buttons, style them with CSS and give them functionality with a few lines of Javascript.
HTML
We add the buttons. Attention! the ids of each element are important. We will use them to link the Javascript functions.
<div class="my-custom-controls">
    <button id="my-capture-preview">Capture and preview</button>
    <button id="my-capture">Capture and download</button>
    <button id="my-video-start">Start recording</button>
    <button id="my-video-stop">Stop recording</button>
</div>
CSS
Let's give the buttons a little style. We use the ox-screen-capture and ox-screen-capture--in-progress classes to show and hide the buttons during recording.
.my-custom-controls {
    display: flex;
    flex-direction: column;
    position: fixed;
    bottom: 10px;
    left: 10px;
}

.my-custom-controls button {
    margin-bottom: 10px;
    border-radius: 8px;
    background-color: #580088;
    padding: 10px;
    color: #FFF;
}

.my-custom-controls button:last-child {
    margin-bottom: 0px;
}

body.ox-screen-capture:not(.ox-screen-capture--in-progress) .my-custom-controls #my-video-stop {
    display: none;
}

body.ox-screen-capture.ox-screen-capture--in-progress .my-custom-controls button:not(#my-video-stop) {
    display: none;
}
Javascript
document.getElementById("my-capture-preview").addEventListener("click", () => {
    oxScreenCapture.capturePhotoPreview();
});

document.getElementById("my-capture").addEventListener("click", () => {
    oxScreenCapture.capturePhoto();
});

document.getElementById("my-video-start").addEventListener("click", () => {
    oxScreenCapture.captureVideoStart();
});

document.getElementById("my-video-stop").addEventListener("click", () => {
    oxScreenCapture.captureVideoEnd();
});
This is how our new buttons look like:
Step 4: Add a watermark with your brand
Onirix Screen Capture allows you to add any image from your asset gallery to the screenshots of your experience. It's a very easy way to add your branding to the images.
import OnirixEmbedSDK from "https://cdn.jsdelivr.net/npm/@onirix/embed-sdk@1.18.1/+esm";
import OxScreenCaptureLib from "https://cdn.jsdelivr.net/npm/@onirix/screen-capture@2.0.0/+esm";

const OVERLAY_ASSET_OID = '<your asset oid>';

const embedSDK = new OnirixEmbedSDK();
embedSDK.connect();
const oxScreenCapture = new OxScreenCaptureLib(embedSDK);

embedSDK.subscribe(OnirixEmbedSDK.Events.SCENE_LOAD_END, async (params) => {
    await oxScreenCapture.setOverlay(OVERLAY_ASSET_OID, { top: 10, right: 10, width: 200, height: 53 });
    oxScreenCapture.init();
});Set overlay image
setOverlay(overlay, params?)-
overlay can be any type of object supported by createImageBitmap, including img, canvas elements or Blob instances. It can also be the OID of a Studio asset that is of type image.
-
params is optional. If provided it must be an object with zero or more of the following attributes:
- top: distance in pixels to the top of the viewport.
- right: distance in pixels to the right part of the viewport.
- bottom: distance in pixels to the bottom of the viewport.
- left: distance in pixels to the left side of the viewport.
- width: width in pixels that the overlay will have.
- height: height in pixels that the overlay will have.
There are incompatible data:
- If you indicate the distance to the right side and to the left side, implicitly you are determining the width of the overlay. If you also add the width value, an exception will be thrown.
- If you specify the distance to the top and to the bottom, you are implicitly determining the height of the overlay. If you also add the height value, an exception will be thrown.
Clear overlay image
clearOverlay()Clears the current overlay. Captures made after calling this method will not show any overlay until an overlay is redefined.


