Self-hosting: Engine SDK
On a second level of access to our tracking, through this Engine SDK, you have the ability to host your experiences and content freely, on your own servers. This SDK offers you access to the core components of our algorithms, allowing for unparalleled control and customization. The Engine SDK enables you to utilize a range of augmented reality tracking algorithms designed to seamlessly anchor digital content to various real-world entities, including surfaces, images, or entire spaces.
Onirix AR Engine SDK is a Source Development Kit that allows to create Augmented Reality experiencies that run in a web browser.

It was built using plain JavaScript and other web standards like WebGL or WebAssembly combined with in-house computer vision algorithms optimized to run in a web browser.
Onirix AR Engine SDK is compatible with the following Onirix tracking modes:
- Image: Will load the image classifier generated for your project and perform detection and tracking of any of its images.
- QR Code: Will detect any QR in the camera feed, return its decoded content and perform tracking.
- Surface: Will use device camera and motion sensors to track an object fixed over any place or surface. This mode has 2 different sub-modes:
- World-Tracking (Default): Allows to place objects fixed at a surface, so you can walk around and see them from different perspectives. Internally uses WebXR device API if the device is compatible (Android with ARCore support for now), and fallbacks to a custom implementation if not, or when using the config option disableWebXR = true.
- Rotation-Tracking: Uses device gyroscope sensor to provide an accurate 360º rotation-only tracking. Useful for scenes where users are not supposed to move and rather look around. Can be enabled using the config option disableWorldTracking = true.
- Spatial: Will recognize a previously scanned environment (space), positioning you within it and initiating World-Tracking from that location.
Onirix AR Engine SDK is agnostic (not tied) to any rendering engine, so you can combine it with any 3D engine library like:
- ThreeJS
- BabylonJS
- Aframe
If you want to have an overview of how the SDK works and make a quick test you may want to go straight to the samples section.
Getting Started
Onirix Studio configuration
First of all, you'll need to access Onirix Studio and create a Project.
If you plan to use Image-Tracking mode, then you'll also need to create an image scene for every marker image you want to be detected so Onirix can generate the required image classifier. For Spatial-Tracking, you'll also need to create an scene by scanning your environment with Onirix Constructor App. If none of these modes are used, then there is no need to create any scene as, when using the SDK, you can provide your own assets and interaction through your hosting and code.
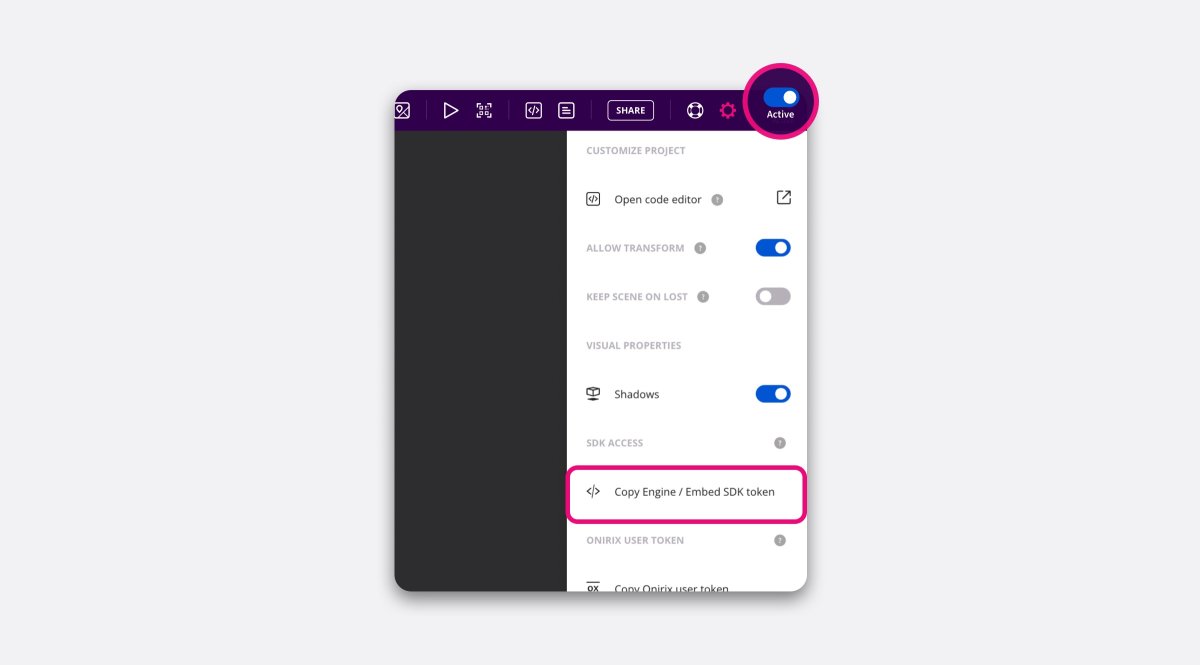
Finally make sure your project is active for consumption, and copy the SDK token to use it as part of the configuration explained below.
Integrating with your Web App
Whether you are integrating Onirix AR Engine SDK to an existing Web App, or creating a new one from the scratch, the following steps are required:
Include Onirix AR Engine SDK
Add a custom script (app.js) to your page html head tag and load it as an async module:
<head>
 ...
    <script async type="module" src="app.js"></script>
 ...
</head>
Inside your custom script (app.js), import Onirix SDK:
import OnirixSDK from "https://cdn.jsdelivr.net/npm/@onirix/ar-engine-sdk@1.11.1/+esm";If you're using a JavaScript framework or a bundler like Webpack, it is recommended to use the NPM package instead.
Instantiate OnirixSDK and create a configuration object
Whenever you want to launch the AR experience, create a new OnirixSDK instance with your Onirix project's token and a configuration object with the tracking mode and other desired paramenters:
    let OX = new OnirixSDK("<your_sdk_token>");

    let config = {
        mode: OnirixSDK.TrackingMode.Image
    }
The mode can be one of following depending on the tracking type you want to use for your experience:
- OnirixSDK.TrackingMode.Image
- OnirixSDK.TrackingMode.QRCode
- OnirixSDK.TrackingMode.Surface
- OnirixSDK.TrackingMode.Spatial
This is the complete list of config parameters:
| Parameter | Type | Description |
|---|---|---|
| mode | OnirixSDK.TrackingType (required) | The AR mode you want your experience to run with. |
| disableWorldTracking | boolean (optional, default: false) | You can use this option to enable Rotation-Tracking. (Surface tracking only) |
| disableWebXR | boolean (optional, default: false) | You can use this option to force using Onirix custom World-Tracking implementation for more homogeneous experiences between devices and OS. (Surface and Spatial tracking only) |
| useVocabulary | boolean (optional, default: false) | Enabling this setting will speed up image detection in exchange of downloading an additional file (25MB) when the experience loads. It is recommended when number of marker images per project is bigger than 30. (Image tracking only) |
| sceneOid | string (required for Spatial mode) | OID of the scene in which you want to relocate |
Initialize Onirix AR Engine SDK
Call init method with prior configuration object as a parameter:
   OX.init(config).then(rendererCanvas => {
       // Onirix SDK has been initialized. Now it's time to set up a 3D renderer
       // with any library (Three, Babylon ...) and subscribe to Onirix events.
   }).catch(error => {
       // Check error name and display accordingly
   });
When calling init, Onirix WebAR SDK will:
- Check your license
- Download required resources (i.e image classifier)
- Request camera and sensors access
- Add a canvas for 3D rendering and a video element for camera background to your page, both adjusted to full screen size.
- Return the canvas so you can initialize your desired 3D renderer library with it.
This may take some time to complete, so it is recommended to show a loading screen before calling it, and hide it when the function completes.
Note that init method returns a promise. You may want to use the new ES6 async / await syntax.
Handle errors
There are 4 types of errors that might occur when initializing Onirix AR Engine SDK. You should check the error type by inspecting its name error.name or using instanceof JavaScript operator to compare with its corresponding error class and display in the form you decide to the user.
In the following table, you will useful information about error types:
| Class name | Name property | Description |
|---|---|---|
| OnirixSDK.LicenseError | LICENSE_ERROR | Might occur if the project is not published, your account has run out of views, has expired, or website domain is not valid |
| OnirixSDK.CameraError | CAMERA_ERROR | Might occur if could not detect or access to back-facing camera, or if camera permissions have been rejected |
| OnirixSDK.SensorsError | SENSORS_ERROR | Might occur if could not detect or access to gyroscope sensor, or motion sensor permissions have been rejected |
| OnirixSDK.InternalError | INTERNAL_ERROR | Might occur in non-compatible devices. Check compatibility for more info |
Subscribe to SDK events
Once Onirix AR Engine SDK has been successfully initialized, you will have to subscribe to events in order to know when an Surface, Image or QR code has been detected an retrieve its AR pose for the 3D renderer.
There are 4 events you may want to subscribe depending on the tracking mode:
| Event | Description |
|---|---|
| OnirixSDK.Events.OnDetected | This event will be called when an Image, QR code or Space is detected, returning an identifier. The identifier corresponds to the Image or Space scene OID in Onirix Studio or the QR Code decoded content in case of a QR code. This event won't never be called in Surface mode. |
| OnirixSDK.Events.OnLost | This event will be called when an already detected Image or QR code is lost, returning an identifier. The identifier corresponds to the Image scene OID in Onirix Studio or the QR Code decoded content in case of a QR code. This event won't be never called in Surface mode. |
| OnirixSDK.Events.OnPose | This event will be called every time a new object pose is computed. Returned pose is a column major view-model matrix in OpenGL coordinates that you must forward to your 3D renderer. |
| OnirixSDK.Events.OnResize | This event will be called every time your device switches between landscape and portrait orientation. When that happens, you must obtain new camera parameters through getCameraParameters function of the SDK and update your renderer with them. |
| OnirixSDK.Events.OnTouch | This event will be called every time users tap the screen (touch start and end), returning the clip-space (between -1 and 1) position of the touch. You may wan't to use it for raycasting and interacting with the scene when users touch. |
| OnirixSDK.Events.OnTouchStart | Similar to OnTouch, but called when the touch starts. |
| OnirixSDK.Events.OnTouchEnd | Similar to OnTouch, but called when the touch ends. |
| OnirixSDK.Events.OnHitTestResult | This event will be called every time a surface is detected throwing a ray forward from camera origin (screen center). It is useful to display a placeholder of a surface before placing the 3D scene. It only works with surface tracking mode. |
| OnirixSDK.Events.OnFrame | This event will be called every frame. Useful for synchronizing tracking and 3D rendering. |
| OnirixSDK.Events.SessionEnd | Called when user exits the AR experience (only Surface and Spatial modes when using WebXR). |
This is how you should subscribe to events:
OX.subscribe(OnirixSDK.Events.OnDetected, function (id) {
   renderer.load3DScene(id);
});

OX.subscribe(OnirixSDK.Events.OnPose, function (pose) {
   renderer.updateCameraPose(pose);
});

OX.subscribe(OnirixSDK.Events.OnLost, function (id) {
   renderer.unload3DScene(id);
});

OX.subscribe(OnirixSDK.Events.OnResize, function () {
   renderer.updateCameraParams();
});

OX.subscribe(OnirixSDK.Events.OnTouch, function (touchPos) {
   renderer.onTouch(touchPos);
});

OX.subscribe(OnirixSDK.Events.OnHitTestResult, function (hitResult) {
   renderer.onHitTestResult(hitResult);
});

OX.subscribe(OnirixSDK.Events.OnFrame, function () {
   renderer.render();
});
Start tracking (and other lifecycle methods)
Once initialization is complete (by calling init), you must call the start method in order for the system to start tracking.
While using Surface mode, it is important to call this method once you've selected the surface to place the model via OnHitTestResult subscription for better tracking results.
In addition to start, there is also a stop method intented for stopping tracking at any time and stop receiving pose updates.
If your app requires to switch between several tracking modes, you can release the SDK by calling the destroy method and calling init again with another tracking configuration.
Coordinate system
Onirix uses a right handed coordinate system with X running horizontally left to right, Y running vertically bottom to top, and positive Z coming out of the screen:
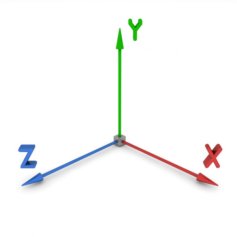
This coordinate system was chosen to match WebGL convention that is also used by many 3D libraries like Three.js. However, there are others like Babylon.js may need some conversions to get the same results. We encourage you to visit our samples to see how we deal with these coordinate transforms for each 3D engine.
Surface mode
While in surface mode, -Z points the horizon, Y points up aligned with gravity, and X is the cross vector between both.
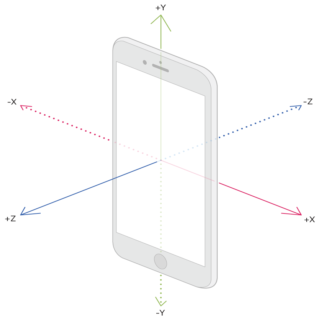
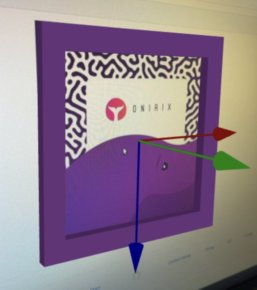
Image mode
While in image mode, positive Y is orthogonal coming out from marker image, X goes right and Z down (-Y in 2D marker coordinates).
Adding image markers at runtime
If your project needs to add image markers at runtime (without previously upload them to Onirix Studio) you can use the addImage method. This method receives as a parameter the image's URL (resolution of 640x480px is required), and an identifier (imageId) so you can check when it's been detected or lost from 'OnDetected' and 'OnLost' callbacks.
Example:
    const imageId = 'custom image id';
    const imageURL = 'https://upload.wikimedia.org/wikipedia/commons/f/fc/EAM_Nuvolari_S1_640x480.jpg';

    OX.addImage(imageURL, imageId);
If your image doesn't fit well with 4:3 aspect ratio you can use it anyway by resizing and adding padding to it so its final dimensions are 640x480px.
Spatial mode
While in Spatial mode, the coordinate system aligns with the scanned environment. This means that, similar to Surface mode, the -Z axis points towards the horizon, the Y axis points upward, aligned with gravity, and the X axis is perpendicular to both, forming the cross vector. However, in Spatial mode, these axes are rotated in such a way that they match the orientation and position of the previously scanned space, ensuring that virtual objects are accurately placed within the real-world context.
Sample projects
You can visit our GitHub account for samples using different tracking modes and 3D rendering libraries:
https://github.com/onirix-ar/webar-sdk-samples
Local development and testing
Onirix AR Engine SDK usage is restricted to purchased domains, however, the following domains and addresses are whitelisted for development:
- localhost
- 127.0.0.1
- 192.168.*
- 10.50.*
- 10.10.*
- 10.0.*
- *.ngrok.io
- glitch.com
- localhost.run
In order to test the SDK from these local addresses, it is mandatory you serve your files through HTTPs. There are plenty of tools out there that may help you with this by generating an self-signed certificate and serving your files with a single command. Take a look at http-server utility.
Compatibility and browser support
Onirix AR Engine SDK is compatible with the following browsers:
| OS | Version | Supported browsers |
|---|---|---|
| iOS | iOS 11+ | Safari, Safari view controller (SFViewController): iOS 13+, Safari web views (WKWebView): iOS 14.3+ |
| Android | Any | Chrome, Firefox, Samsung Internet, Edge, native android web views (Android 4.4+) * |
*Other browsers may be also compatible if supporting the following capabilities: WebGL, CameraAPI, DeviceMotionAPI, WebAssembly (WASM).
Devices must also conform to the following hardware requirements:
- Rear camera with at least VGA resolution (640x480px)
- Gyroscope sensor (only required for surface and spatial tracking modes).
- 2 GB of RAM
Licensing
Using Onirix AR Engine SDK is limited to Onirix users.
There is no limit to the number of Web AR experiences you create with the SDK. However, they could be only consumed a limited number of times, regulated by your plan's monthly views. A view is generated every time a user opens your experience and it loads without errors.
Self-hosting the experience in a public site (not local development) requires to purchase a domain (often a domain is included with certain Onirix plans).
See Onirix Pricing for more information.