Datastore
Usually, when creating a new Web AR experience, including some extra information that can be structured in different ways, can be a powerful combination to create even more useful experiences.
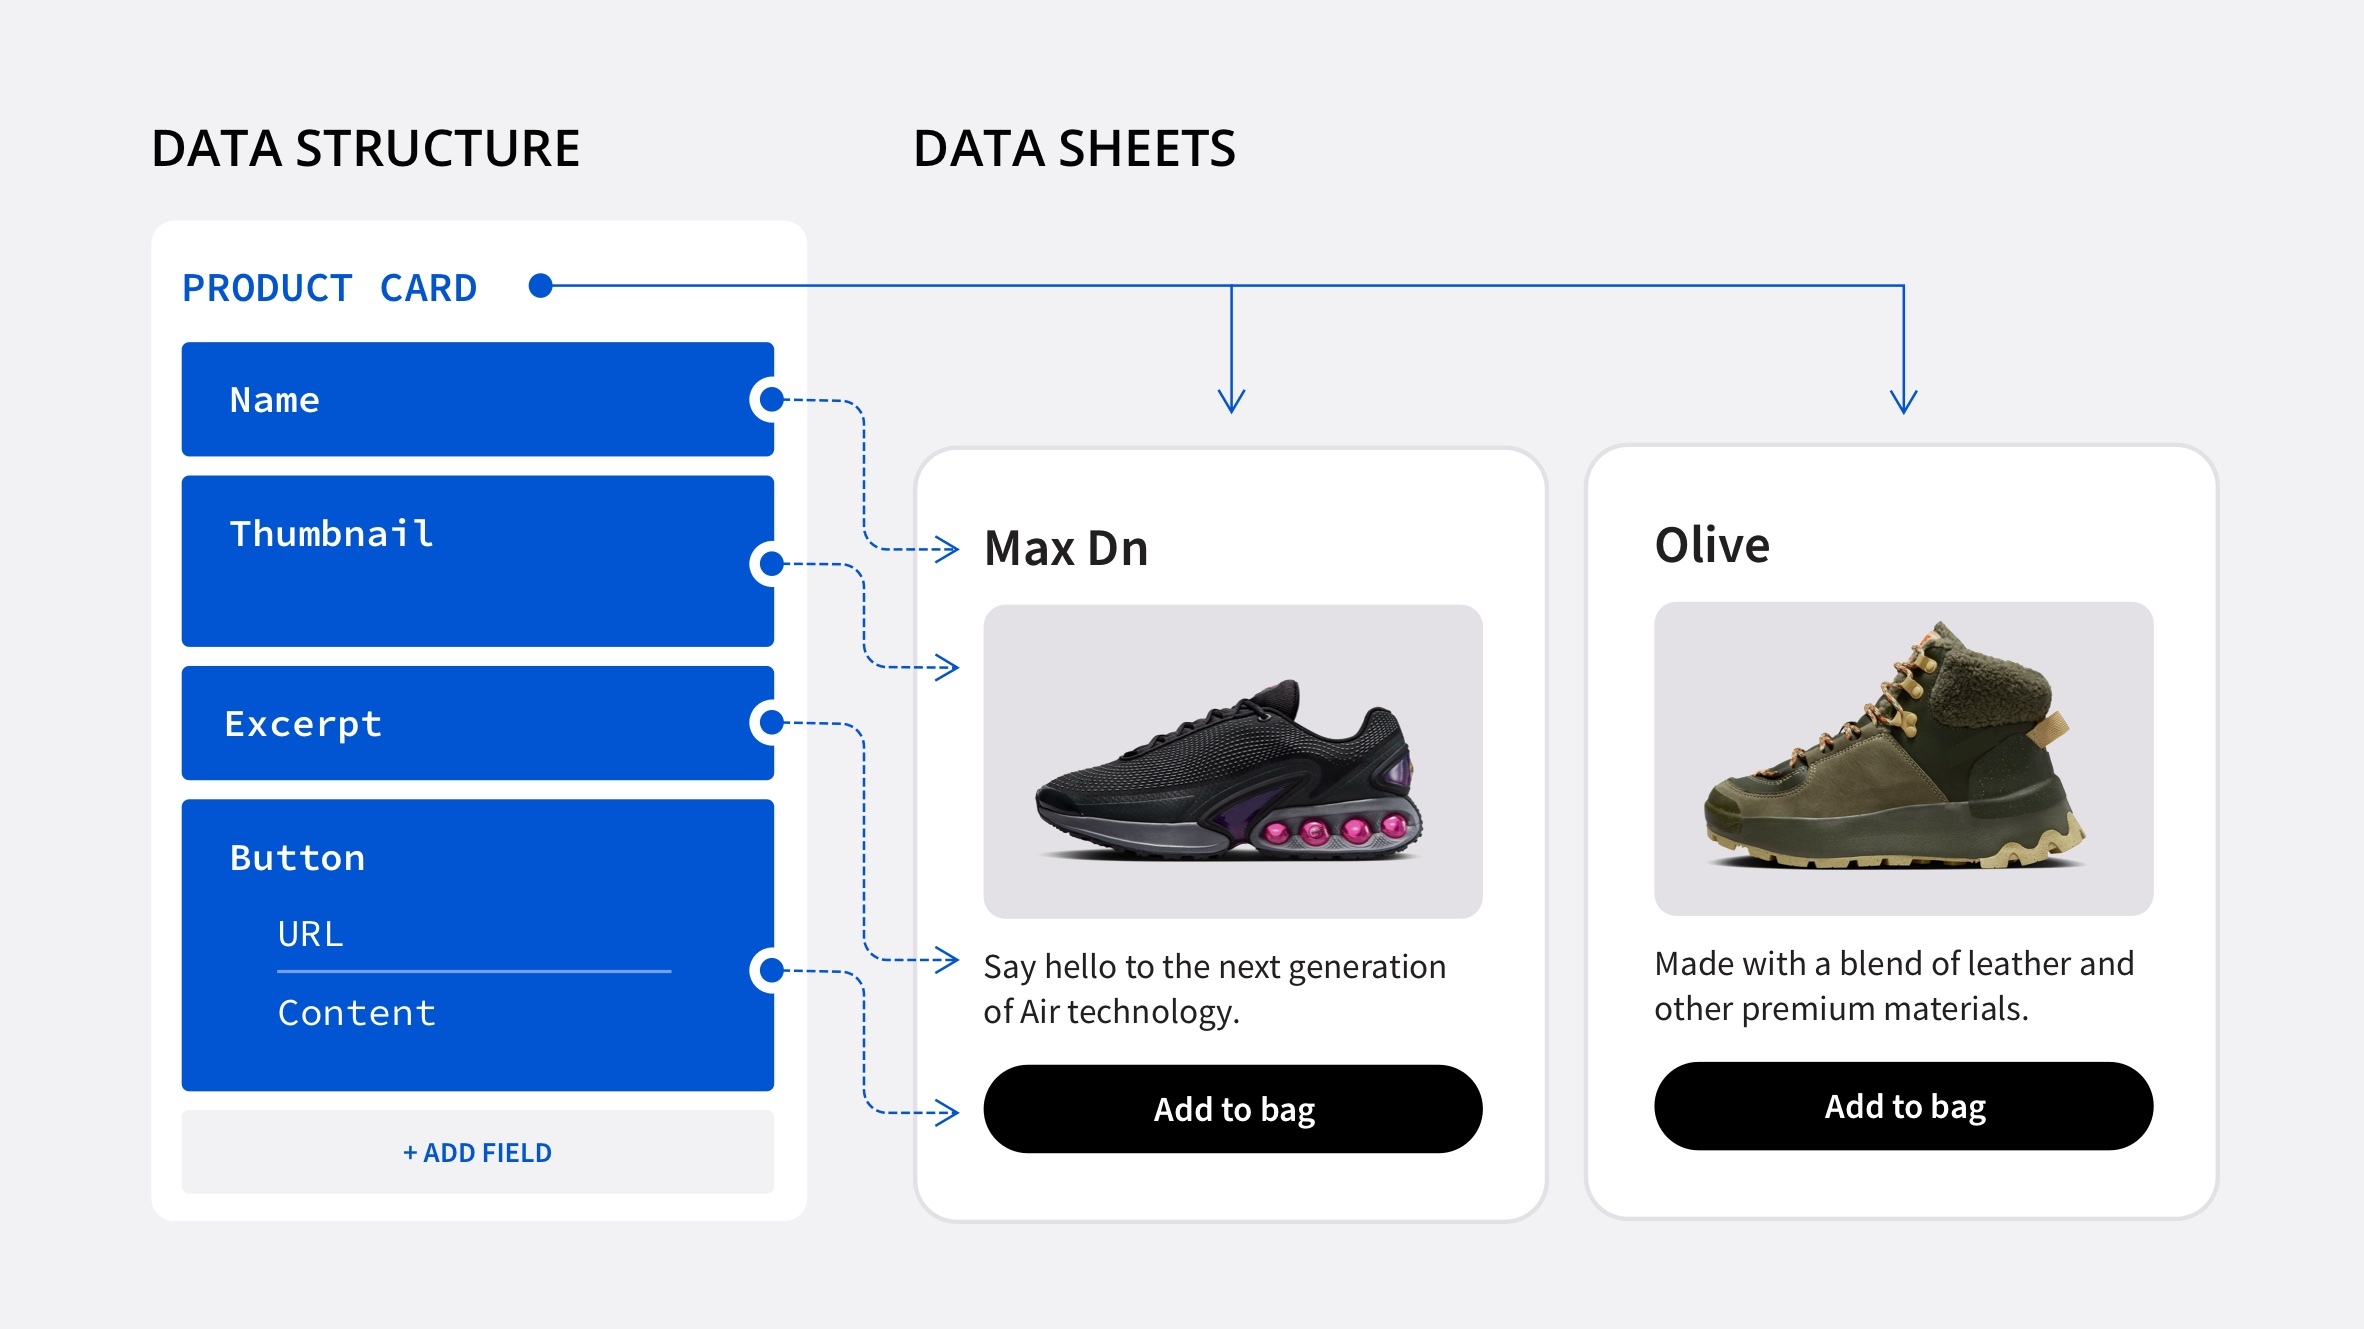 With this feature you can include Data structures in Onirix, fill them with specific information, to connect it later to your elements within the scenes. This meta-information can be structured in our platform, and filled with information using Data sheets.
For example in this experience from our library, you can see a product sheet when click on the Detail button of each trainer. Check it out!
To consume all the information you add to your Data Sheets, you can do ir from the code editor, and accessing these structures through our Embed SDK (via JavaScript).
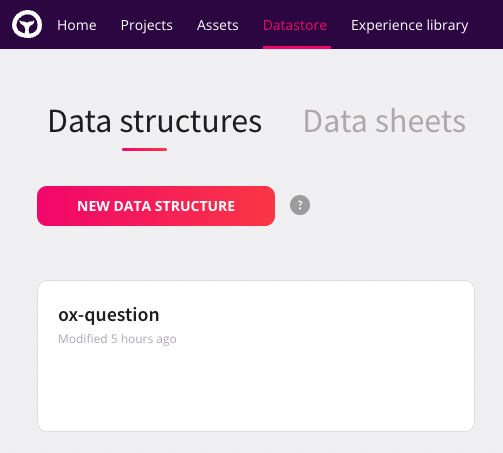
When you access the Datastore functionality in Onirix, you will see within your main menu a new block representing this concept. When you log in you will see that you have the possibility to create new Templates and Datasheets for your projects.
What can I use the Datastore for?
The capabilities of the Datastore are varied and very powerful. Let's say that with it you have the flexibility to create information structures to consume within Onirix experiences, and with it you could do things like the following:
- Create data structures for content cards: as we will see in the examples below, thanks to the Datastore you can create data structures that allow you to display information about the content you want. It can be a product card, information about a dish in a restaurant, the technical data sheet of a car, or anything you can think of.
- Internationalisation: you can use the datastore to create structures where you define the translation texts of any string you display in your experiences. You can also provide a visual mechanism for non-technical people to easily modify these strings or values.
- Connection with Onirix modules: as you can see in the section of this documentation (modules), thanks to the Datastore you can access advanced functionalities that connect with data structures predefined by our technical team.
- Configure parameters of an experience (config file): you can have this type of structure to define all the parameters of an experience, and that any of your team members, or your customers, have the ability to modify them freely without having to access code. For example, imagine you have a gamification dynamic with different parameters such as difficulty level, game time, number of enemies, etc. You could have them defined and modifiable in one of these data structures.
Components of the Datastore
Data structures (templates)
Data structures are templates of fields, or schemes of information that you can create in Onirix, just adding as many fields as you need to complete your structure.
Supported field types are:
- Textfield: For small texts
- Textarea: For big texts
- Rich text area: For big texts with text editor.
- Image: References a 2D asset
- URL: HTTP URL
- Dropdown: List of string values
- Boolean: True or False
- JSON: a lightweight, text-based data format used for representing structured data as key-value pairs, arrays, and nested objects.
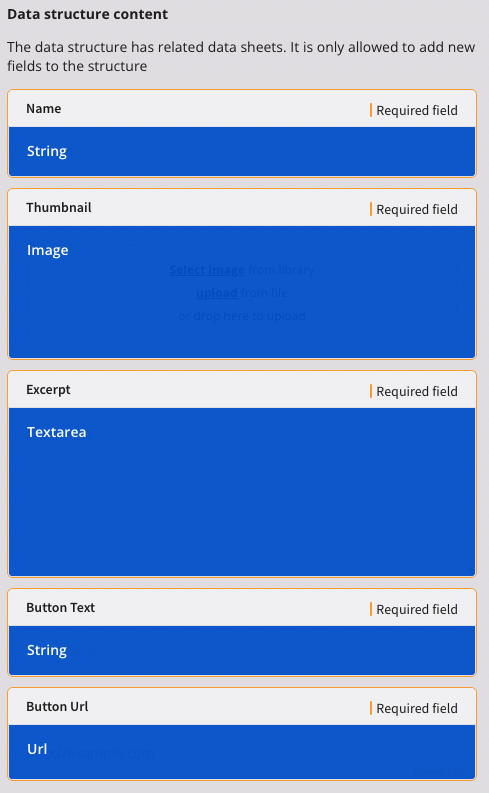
Example of Data structure of an online product
For example, let's create the structure for a Product information:
- Data Structure name: Product
- Data Structure fields:
- Name: Textfield
- Excerpt: TextArea
- Thumbnail: Image
- ButtonText: Textfield
- ButtonURL: URL
Data sheets
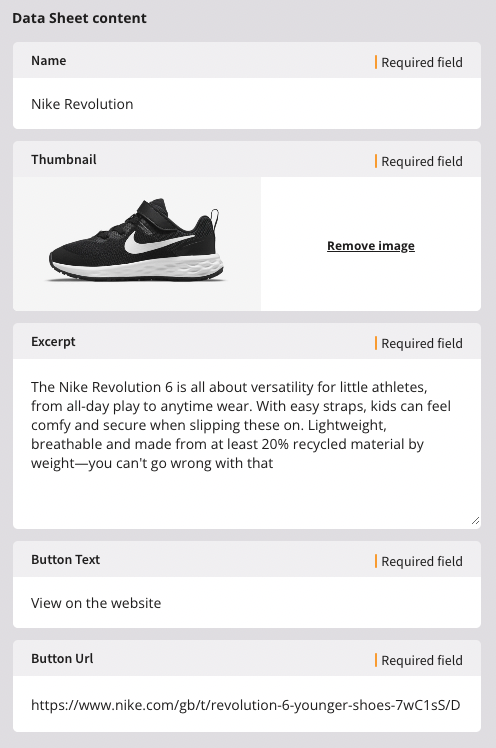
Data Sheets store the actual data according to the structure defined previously. You can create multiple Data Sheets of the same Data Structure to give values and this way to fill the needed information:
For example, following the example above, you may have a Product like this:
How to access Data sheets from the Scene editor
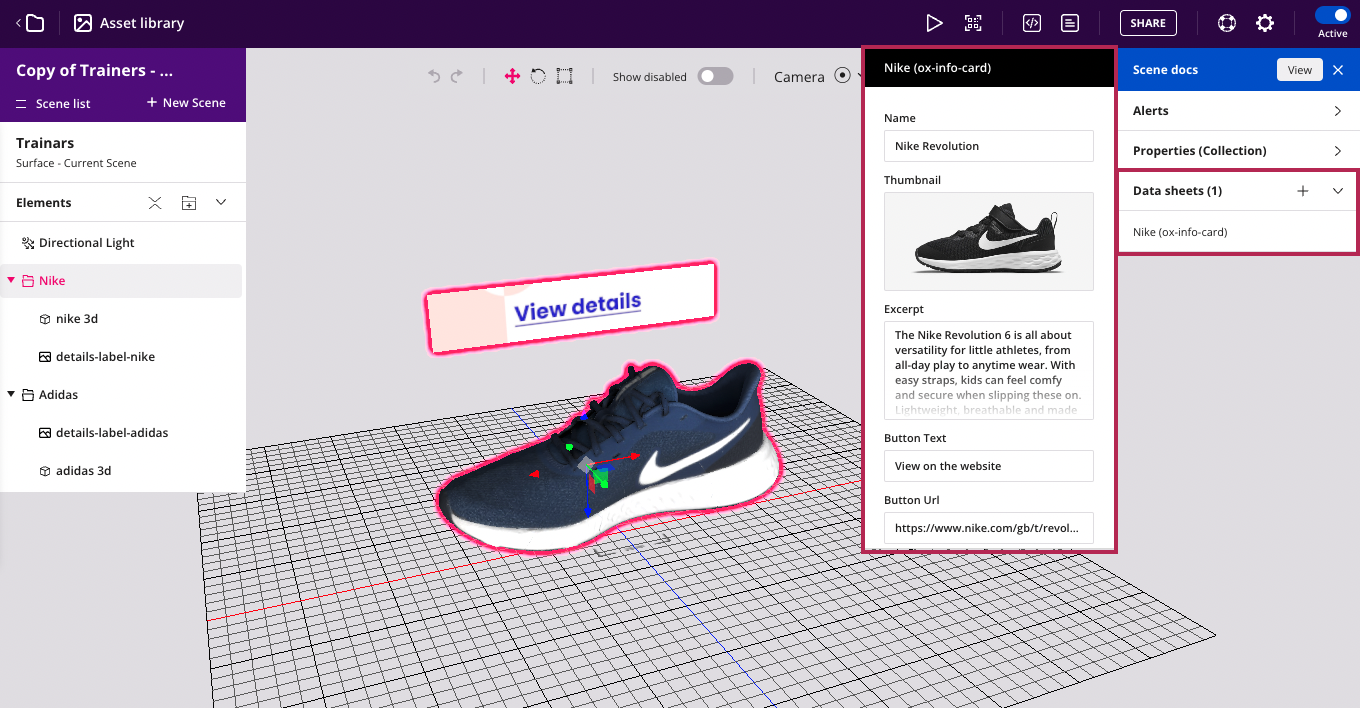
In addition, from the general Data Sheets screen, you can also assign and modify Data sheets from the Scene editor. In this case, for example, if we want to associate a series of information to a scene element, we will see a new block in the properties menu of the element, where we will have its datasheets organised. From this place we can easily access its creation, visualisation and modification.
Finally, you can consume all the information you add to your Data Sheets from the code editor, accessing these structures through our Embed SDK (via JavaScript).
Complete example with Embed SDK: experience with Product data sheet
Let's see an example of how to consume a content file created from our Datastore, using the structure proposed for the Product in our previous example.
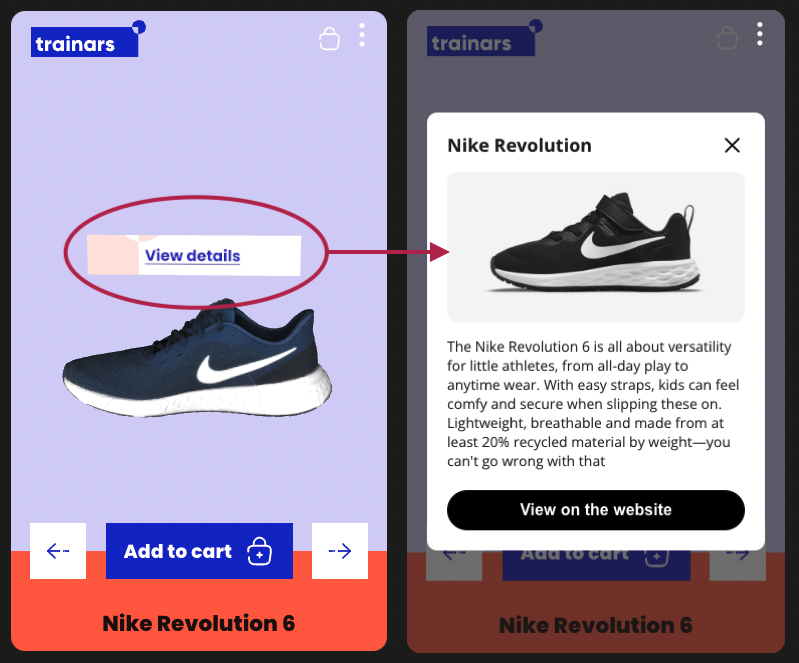 In this case we will see a sports shoe placed on the surface, with a button to view product details, which will open a product sheet with the data entered in the datasheet, as shown in the image.
To try this same example yourself just open this experience: trainers example with datastore connection.
How to consume datasheets from the online code editor
Once we have created the data structure in the datastore, we can include the data sheet associated to the product within the scene editor, including the values we want, as we can see in the previous section. Then we are ready to start consuming the information from the online code editor, and to create an HTML sheet to show to our end-users.
First thing is to listen to the SCENE_LOAD_END event of the Embed SDK. Here you will find all the potential data sheets associated to the elements of the scene, included within the params of this event. When we receive the SCENE_LOAD_END we use this function to look for all the data sheets that can coincide with the template name we have created (this is the data structure). These params may contain elements, and these elements may have one or more data sheets associated with them. What we need to do is to look for those that match the name of the data structure (Template) we want:
embedSDK.subscribe(OnirixEmbedSDK.Events.SCENE_LOAD_END, (params) => {
        oxExperience.addDatasheets(params);
});

addDatasheets(params) {
    let i = 0;
    while (i < this.items.length) {
        params.elements.forEach(element => {
            if (element.oid == this.items[i]?.oid) {
                this.items[i].datasheet = element.datasheets.find(datasheet => datasheet.template.name == this.TEMPLATE_NAME);
                    i++;
                }
            })
        }
    }
Note that we refer to the data structure as a template inside the object that contain all the data sheets, so we comparte by name using the access to the template.name
Then, when we receive an ELEMENT_CLICK we process it this way:
embedSDK.subscribe(OnirixEmbedSDK.Events.ELEMENT_CLICK, (params) => {
    oxExperience.onClick(params.name);
})
With this we can call to this async method like this, and here is where we can obtain all the information from each field of our data sheet to fill the Product card info. As you can see we access the data sheet fields accessing the itemClicked.datasheet.content[N], being N the position inside the original structure (0 for Name, 1 for Image, 2 for Excerpt, 3 for Button text and 4 for Button URL):
async onClick(name) {
        const itemClicked = this.items.find(item => item.details == name);
        if (itemClicked) {
            const cardInfo = {
                name: Object.values(itemClicked.datasheet.content[this.NAME_POISITON])[0],
                thumbnail: URL.createObjectURL(await this.embedSDK.getAssetImage(Object.values(itemClicked.datasheet.content[this.THUMBNAIL_POSITION])[0])),
                excerpt: Object.values(itemClicked.datasheet.content[this.EXCERPT_POSITION])[0],
                buttonText: Object.values(itemClicked.datasheet.content[this.BUTTON_TEXT_POSITION])[0],
                buttonUrl: Object.values(itemClicked.datasheet.content[this.BUTTON_URL_POSITION])[0]
            }
            this.onOpenCardInfo(cardInfo);
        }
    }
The rest of the code can be found in this link from our github channel. Here you can see how we create the HTML elements, include CSS styles and how we complete the rest of the code to create the sample experience.
Modules connected with the Datastore
The Onirix Datastore also can help you to use some of our modules (pieces of code you can easily import within the online code editor), that you can use to feed the experiences with your information: checklists, sequences of steps, questionaries, etc.
Thanks to this connection you will be able to use advanced modules, simply by importing them into the code editor, and filling in the information relevant to your experiences through the Datastore.
