Events
A really interesting part of creating AR experiences with Onirix is the ability to include various types of user interaction. To achieve this Onirix has an Event manager that allows you to trigger actions, which can have transitions, sounds, delay, and execution duration.
In this video tutorial ("How to add events in your scenes") you can see a brief overview of how to include events and actions in your experiences
Event manager
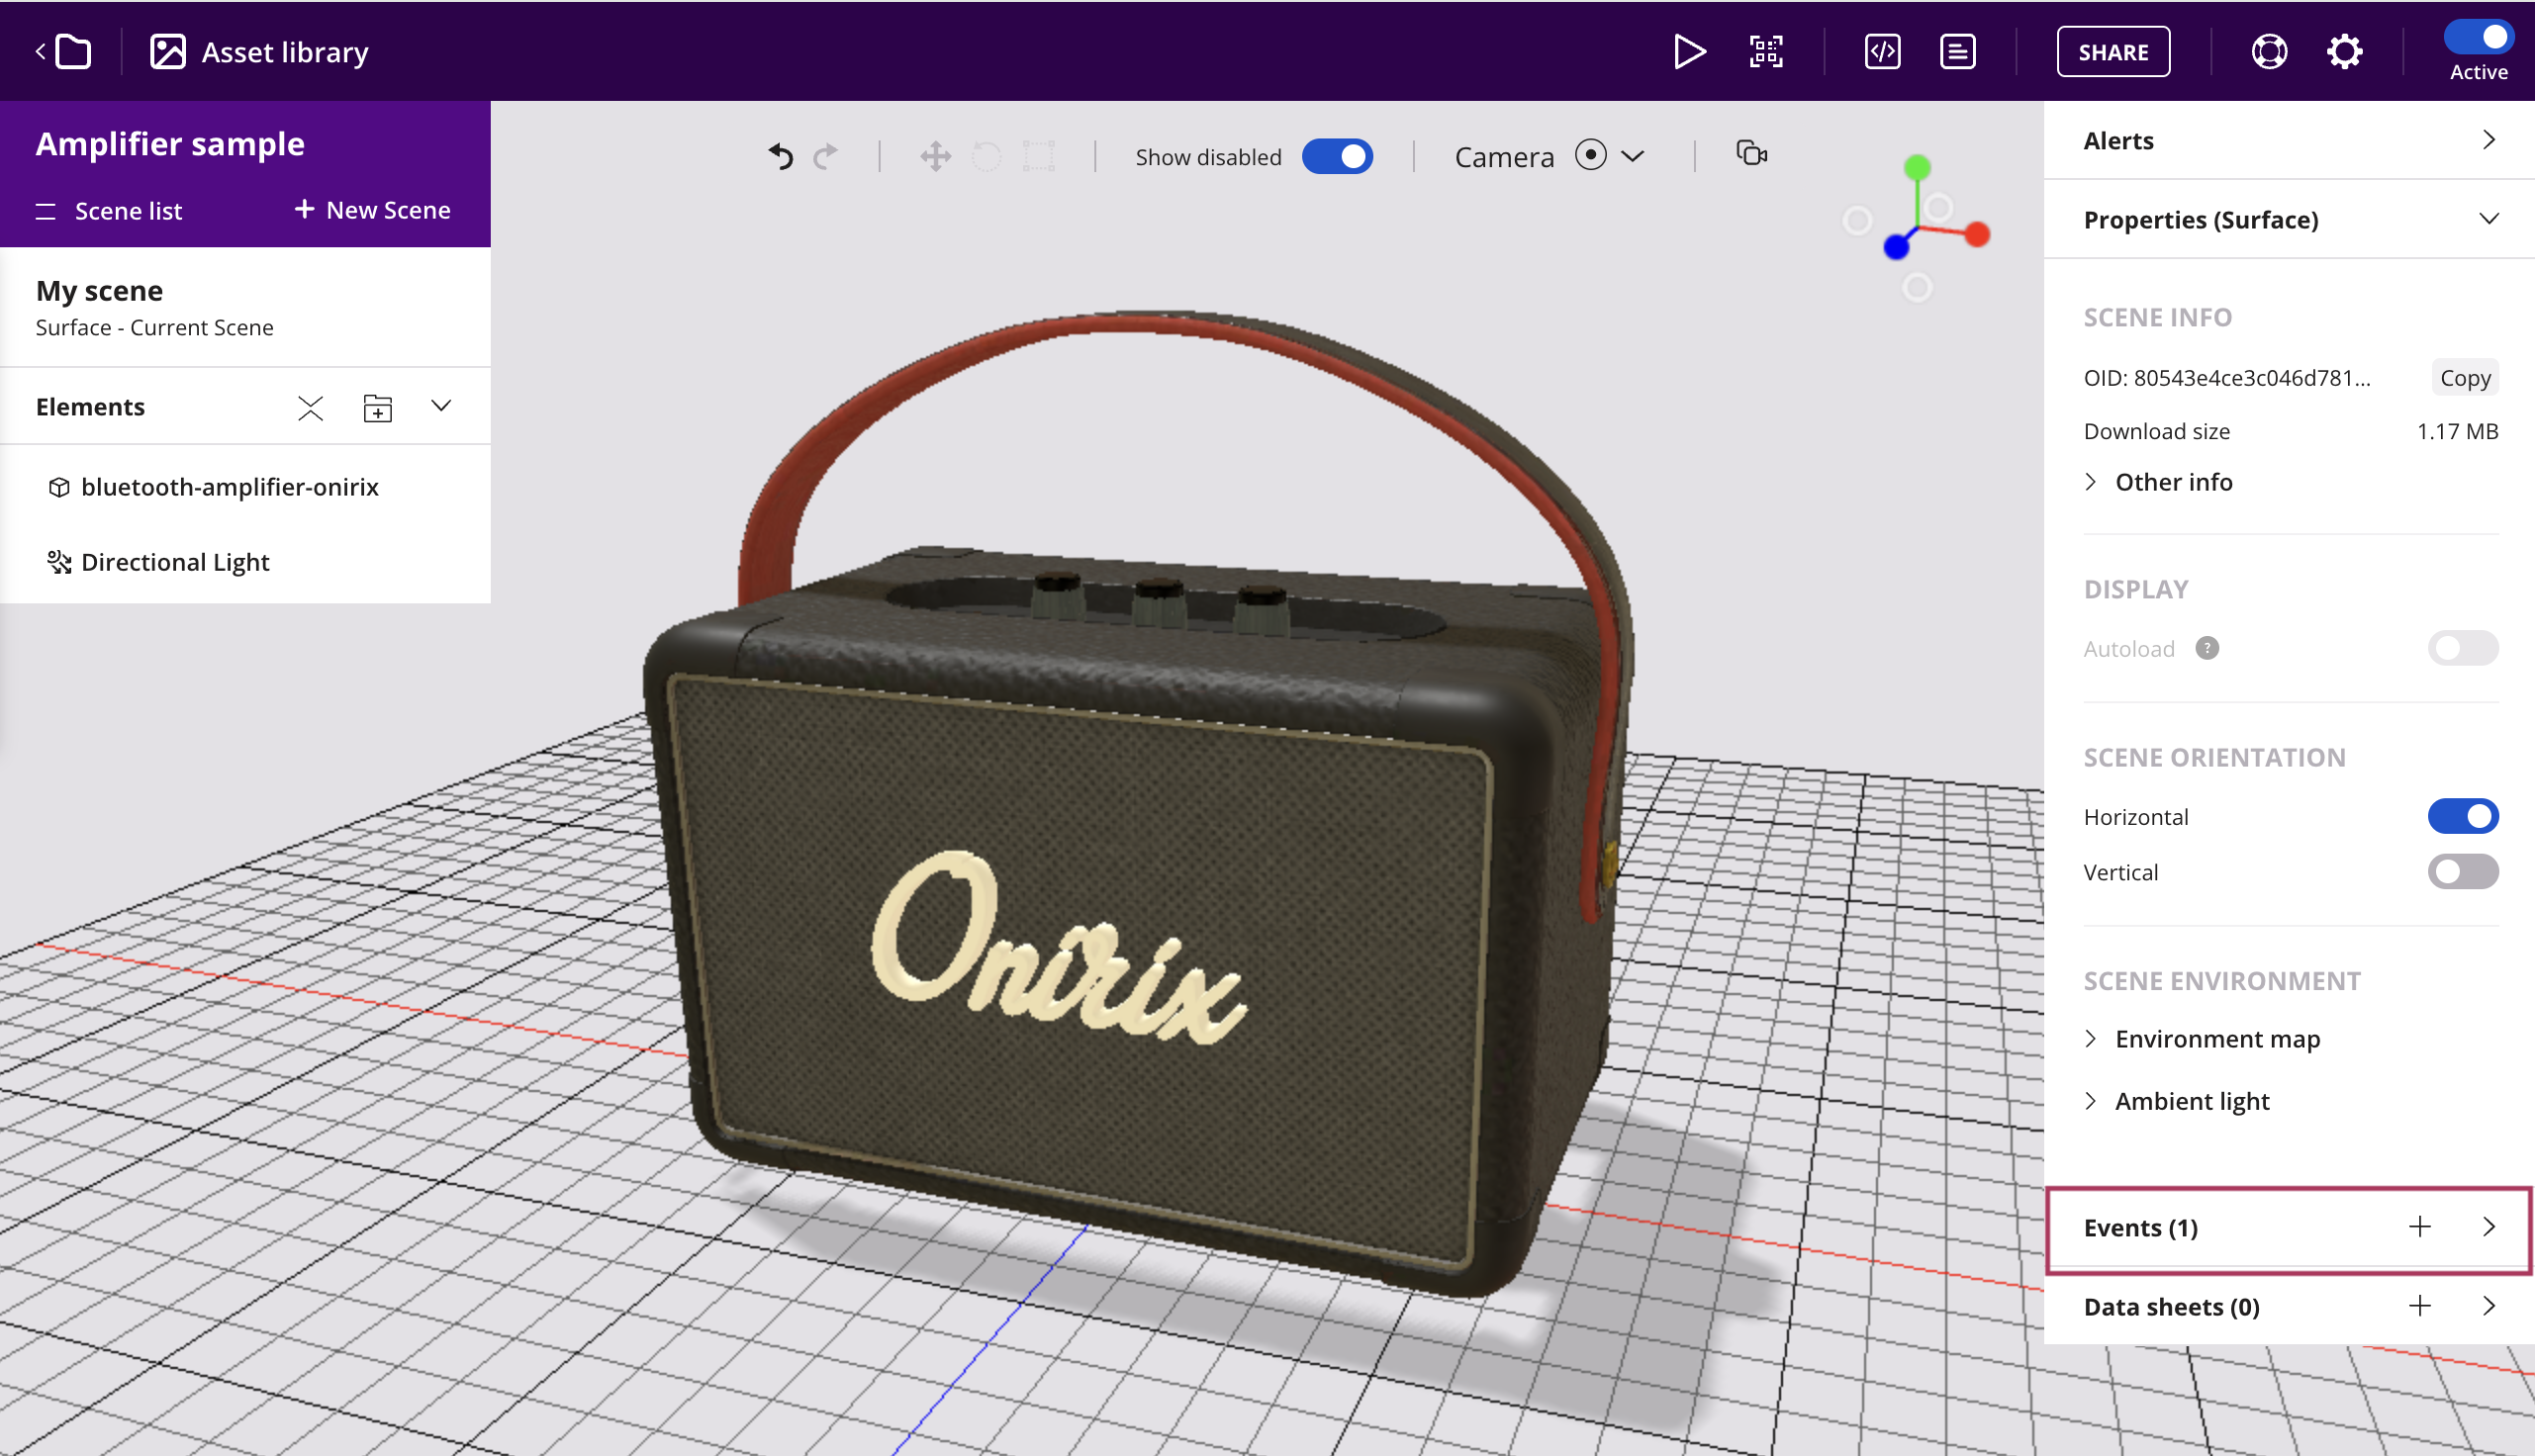
In Onirix you can manage the events of your experiences from within the scene editor. To do this there is an item in the right menu of the editor, at the bottom, where you can add new events, and access the list of events that have already been added.
Event manager sections
Within the event manager, i.e. the place where you can create and modify the events associated with the scene or elements, there are 4 main parts:
- First is the title, which tells us the reference of where this event is being applied (it can be in the whole scene, or in an element of it).
- Then we have the event selector. This allows us to choose between "scene load" possibilities if it is a scene-wide event; or the "click", "finish" and "proximity" options if it is the case of an element.
- Below that we have the action selector. Here we can choose from a large set of potential actions depending on the selected event (see table).
- To the right is the action customisation block. This block offers different options depending on the selected action. For example, the "enable visibility" actions will be different from the "play animation" actions. In this block we can also configure things like the transition (if applicable), default transition sound, waiting time until the action is executed (delay), duration of the action...
Types of Events: Scene or Element events
In Onirix, events can be triggered in two main ways: when the scene is loaded, or when one of the elements of the scene is acted upon (either by clicking on the element, or by the proximity of the camera to the element). Thus we can handle events on the scene or events on any of the elements of the scene.
Scene events: On load scene
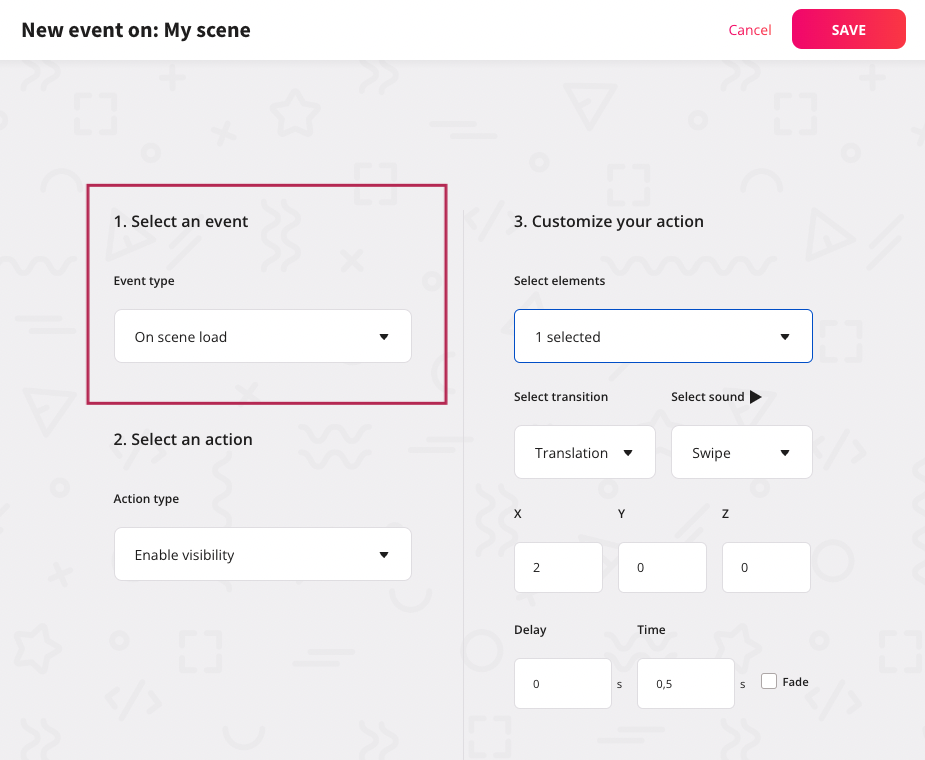
If we select the whole scene (by clicking on the name of the scene in the left menu), when adding an event we will see that the only option is the "On load scene" event.
The list of events we add in this block will be executed when the AR scene is fully loaded. Let's say that this group of events allow us to perform the initial loading actions of the scene, such as initial transitions, activation of initial animations, maybe playing some sound, etc. Somehow this is the interactions we include to present the content to the user at the beginning of the experience.
On load scene example: visibility & translation transition
For example, let's say we want to present a product in the scene, that appears in front of the user with some movement. We want this amplifier to appear from the top-left part of the scene. Something like this:
In order to achieve this, we would need to do several things.
- Firstly, we would place the amplifier in the area of the scene where we want it to appear at the end of the transition, in its "destination" position. And we would also set its "enabled" property to unchecked, so that it would be invisible at the beginning.
- From here we can define a new translation transition event, which will be activated in the "on scene load" and which can have the following parameters.
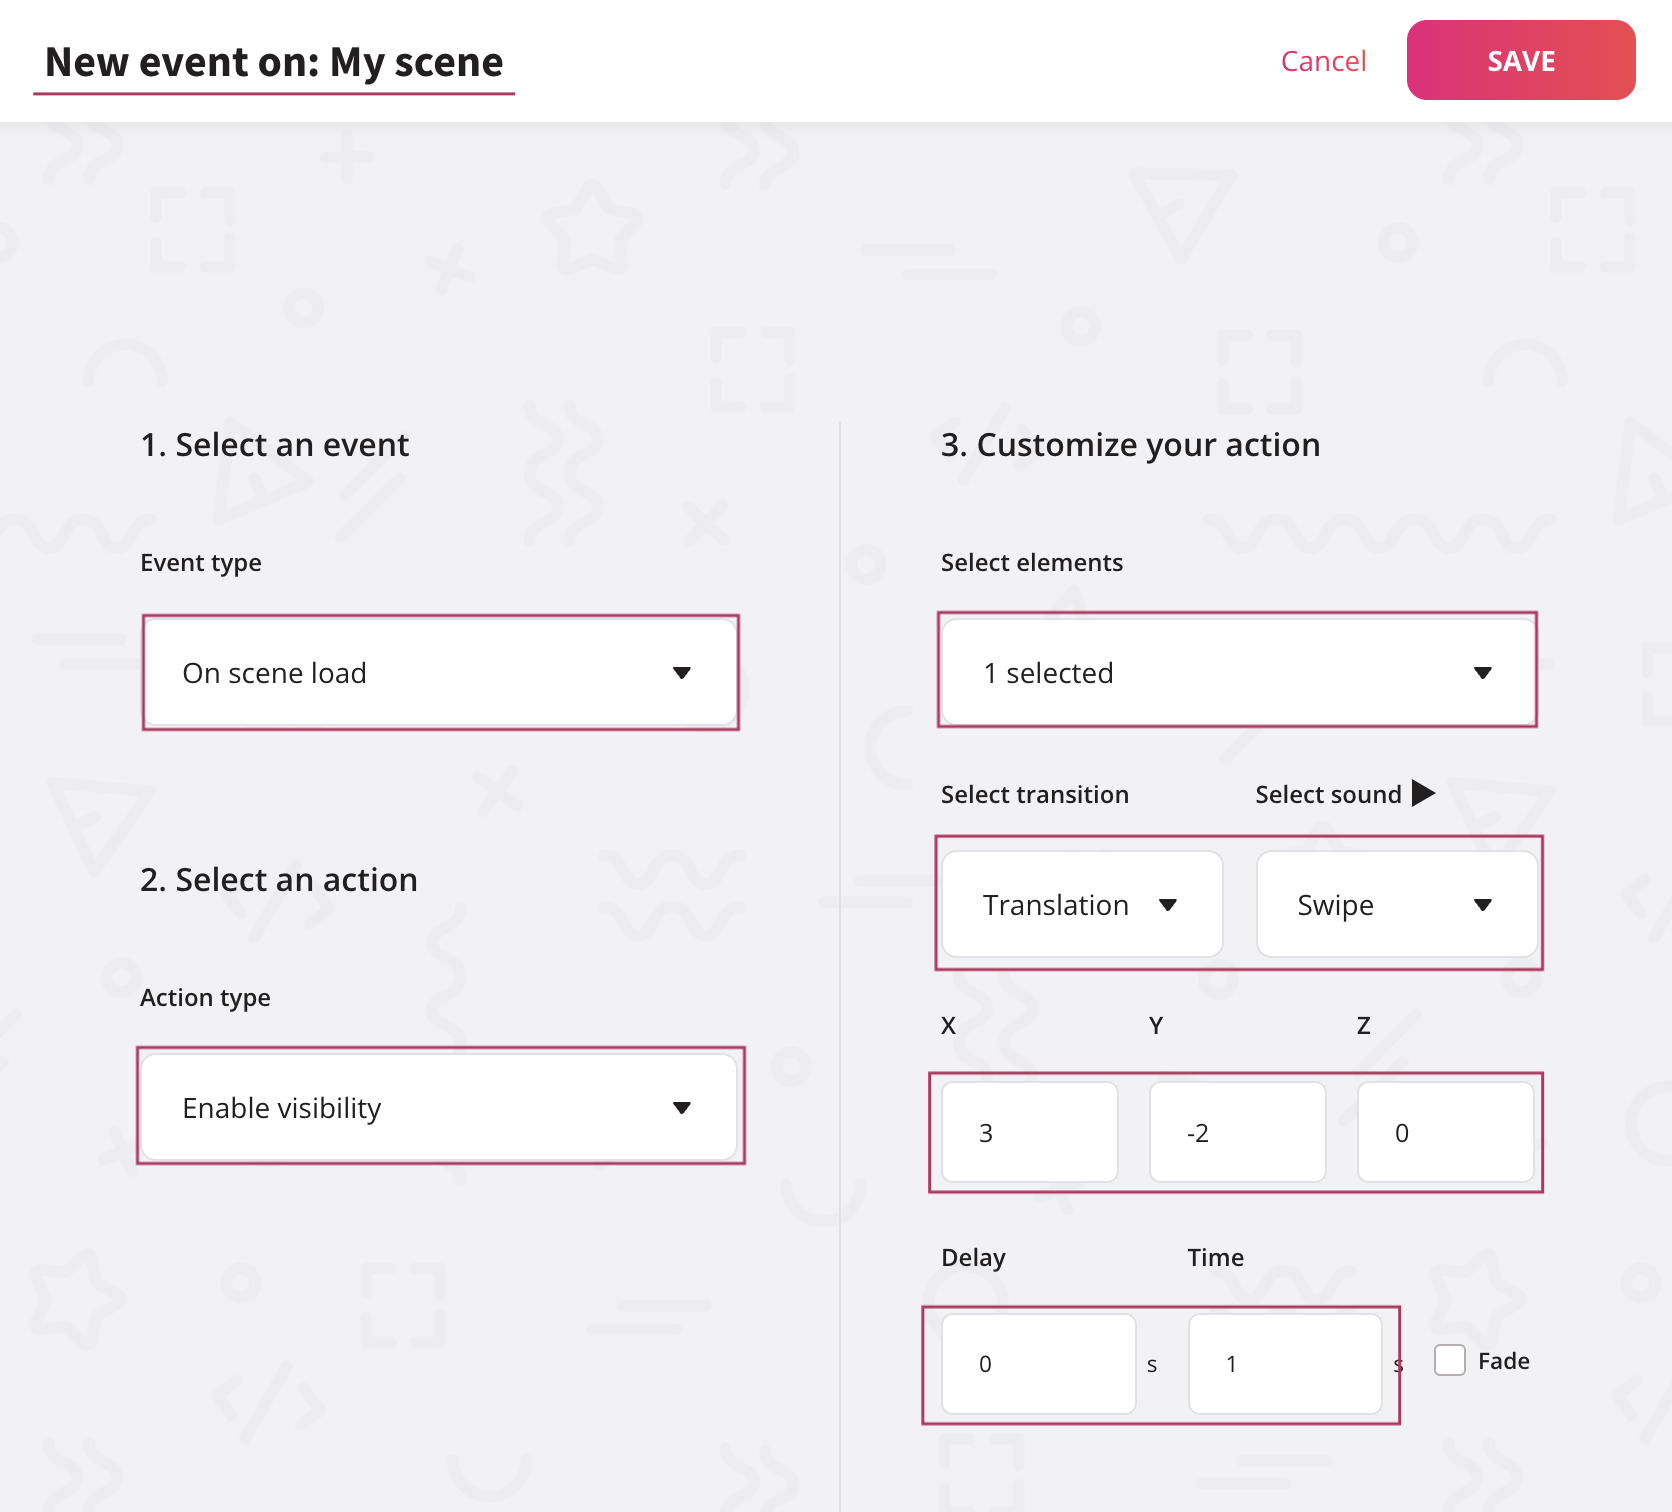
As we can see in this case we have the following data defining this event:
- Event that takes place in the complete scene "MyScene" (that is the name of this specific example scene).
- The selected event, as this is a scene event, should be "on load scene".
- As we want to present the 3D model to the user (making it visible), the action to include is "Enable visibility".
- The "selected elements" to apply the action, in this case are only the 3D model of the amplifier.
- For this example we select a transition and a sound: Translation with "swipe" sound. The translation transition would move the element selected depending on the settings we chose in the following section.
- As this is a translation of an element, we have to set the increase or decrease of movement, in each axis, to experiment. In this case we want to move it 3 units to the right (this is a +3 units in the X axis), and 2 units to the bottom (this is a -2 units in the Y axis).
- And finally we can set the amount of time to wait until the event takes place, in seconds (delay); and the duration of the transition in seconds (time). And also if we want this to happen with a fade effect.
On load scene: play animation
A very common use of the scene load event is to trigger a default animation of the 3D model you have added to the experience. In this case what you can do is to follow an example like the one above, simply selecting the ‘play animation’ action and the corresponding animation of the chosen element. Similar to how we activate the animation in this other example of the click event.
So remember, to activate the default animation of a model at the start of the experience, the way to do it is to add a ‘play animation’ event in the on scene load.
Element events: Click, Finish and Proximity
The other type of events that we can include in our experiences are those that take place when something happens on one of the elements of the scene. For this we have to select the element in the scene we want to apply any event, and then go to the Events menu and click +.
Mainly we can execute 3 types of events on the elements: click, finish and proximity. The finish event only applies to multimedia elements such as audios or videos. The proximity event in turn has two possible variations, proximity enter and proximity exit.
Click event example: play animation
When the user clicks on any of the elements in the scene, an interaction between the experience and the person is initiated. It is important to be able to give our content the ability to respond to these actions.
In this example we can see how clicking on the 3D model of the amplifier launches an animation that allows us to see the change of configuration of the product, with a small jump.
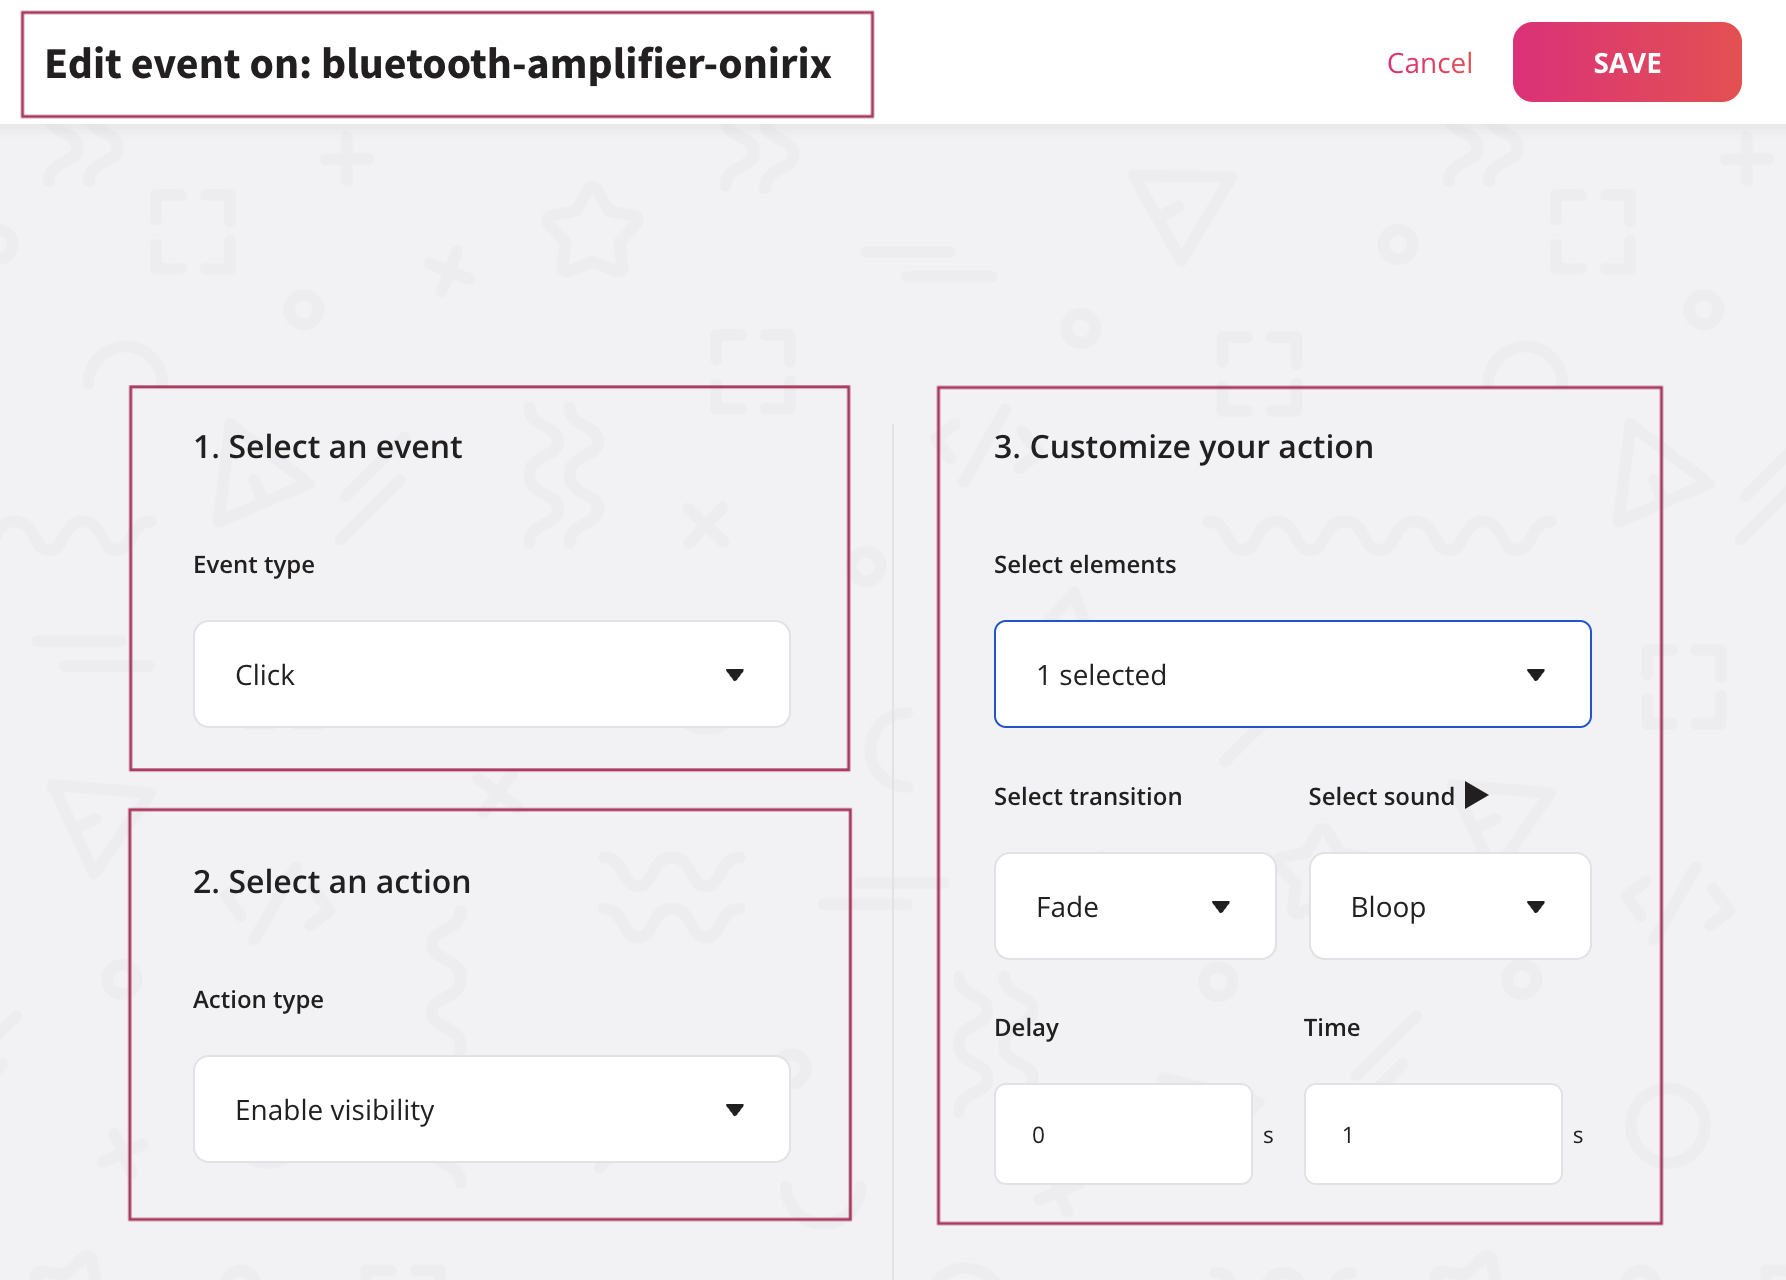
In this case the configuration of the complete event would be something similar to what we have in the following image:
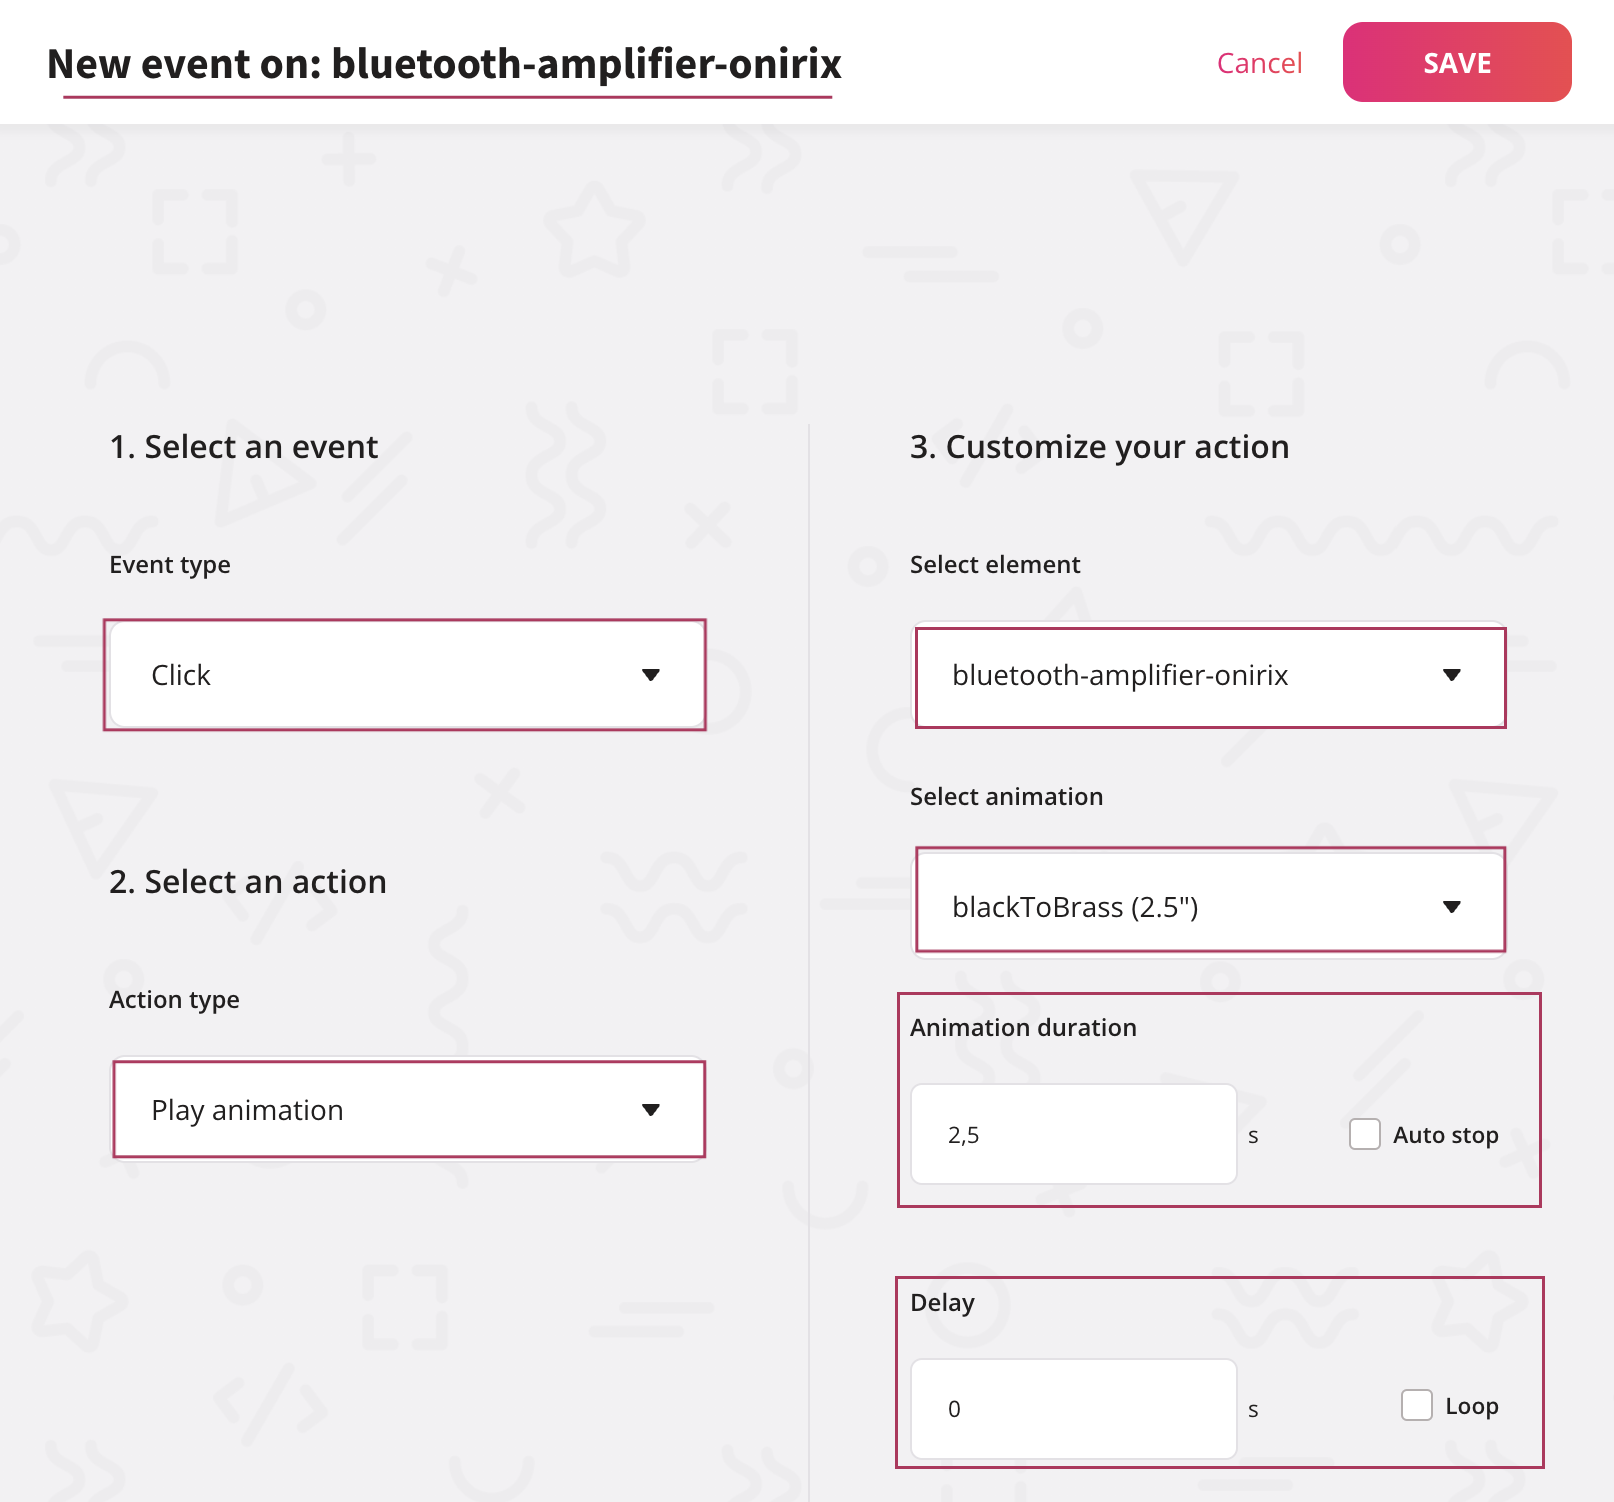
- The title indicates that this event will be launched on that specific element.
- The event type for this example is the "Click" event, so it will be triggered when any user clicks on the 3D model.
- The action to trigger after the click will be "Play animation"
- The specific element name where we will be triggering the action, so this is the element with the animation (in this case is the same element we are clicking).
- The animation to play after the click.
- We can set the duration of the animation. This way we can set it up quicker or slower if we want to. We can also set the "Auto stop" at the end of the animation.
- We can also set the delay to wait from the click until the animation starts in seconds. And also we can set this animation as a loop if we want to.
Click event example: Translate to
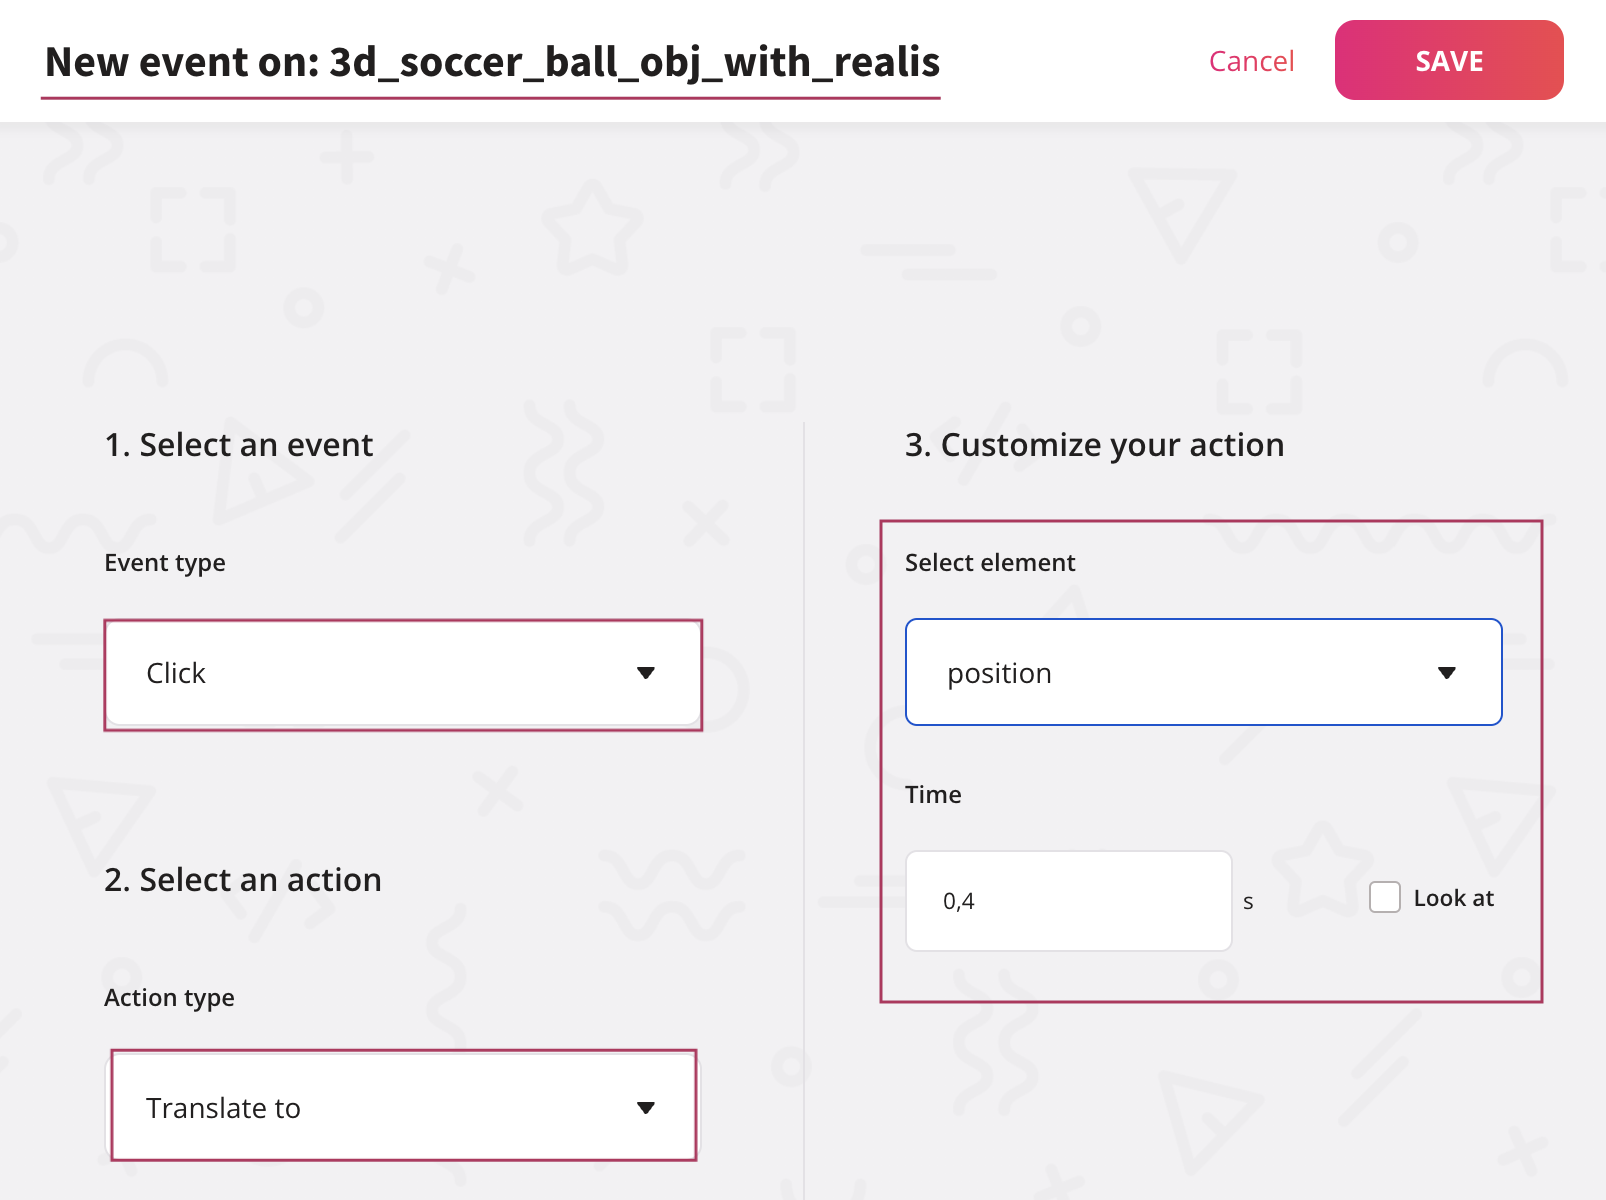
Another interesting example of things that can be done with click events is a case like this. Let's imagine that we want to move in a given time, element A (in this case a ball), to the position of element B in the scene (in this case an invisible label that marks the position inside the goal). For this we can use the "translate to" action in this way. With this we can mark invisible zones in our experience, and nest actions to generate different types of movements. In this case we will see a very simple example of a shot on goal:
To do this we can configure an event like the following on the element of the scene represented by the 3D ball:
- In order to do this we should add a new event to the 3D model of the ball.
- We would assign a "click" event to it.
- We would associate an action to trigger when the ball is clicked, in this case "Translate to".
- And we select the destination element ("position" represented by the label), and the duration of the movement (0,4s).
Finish event example: finish sound
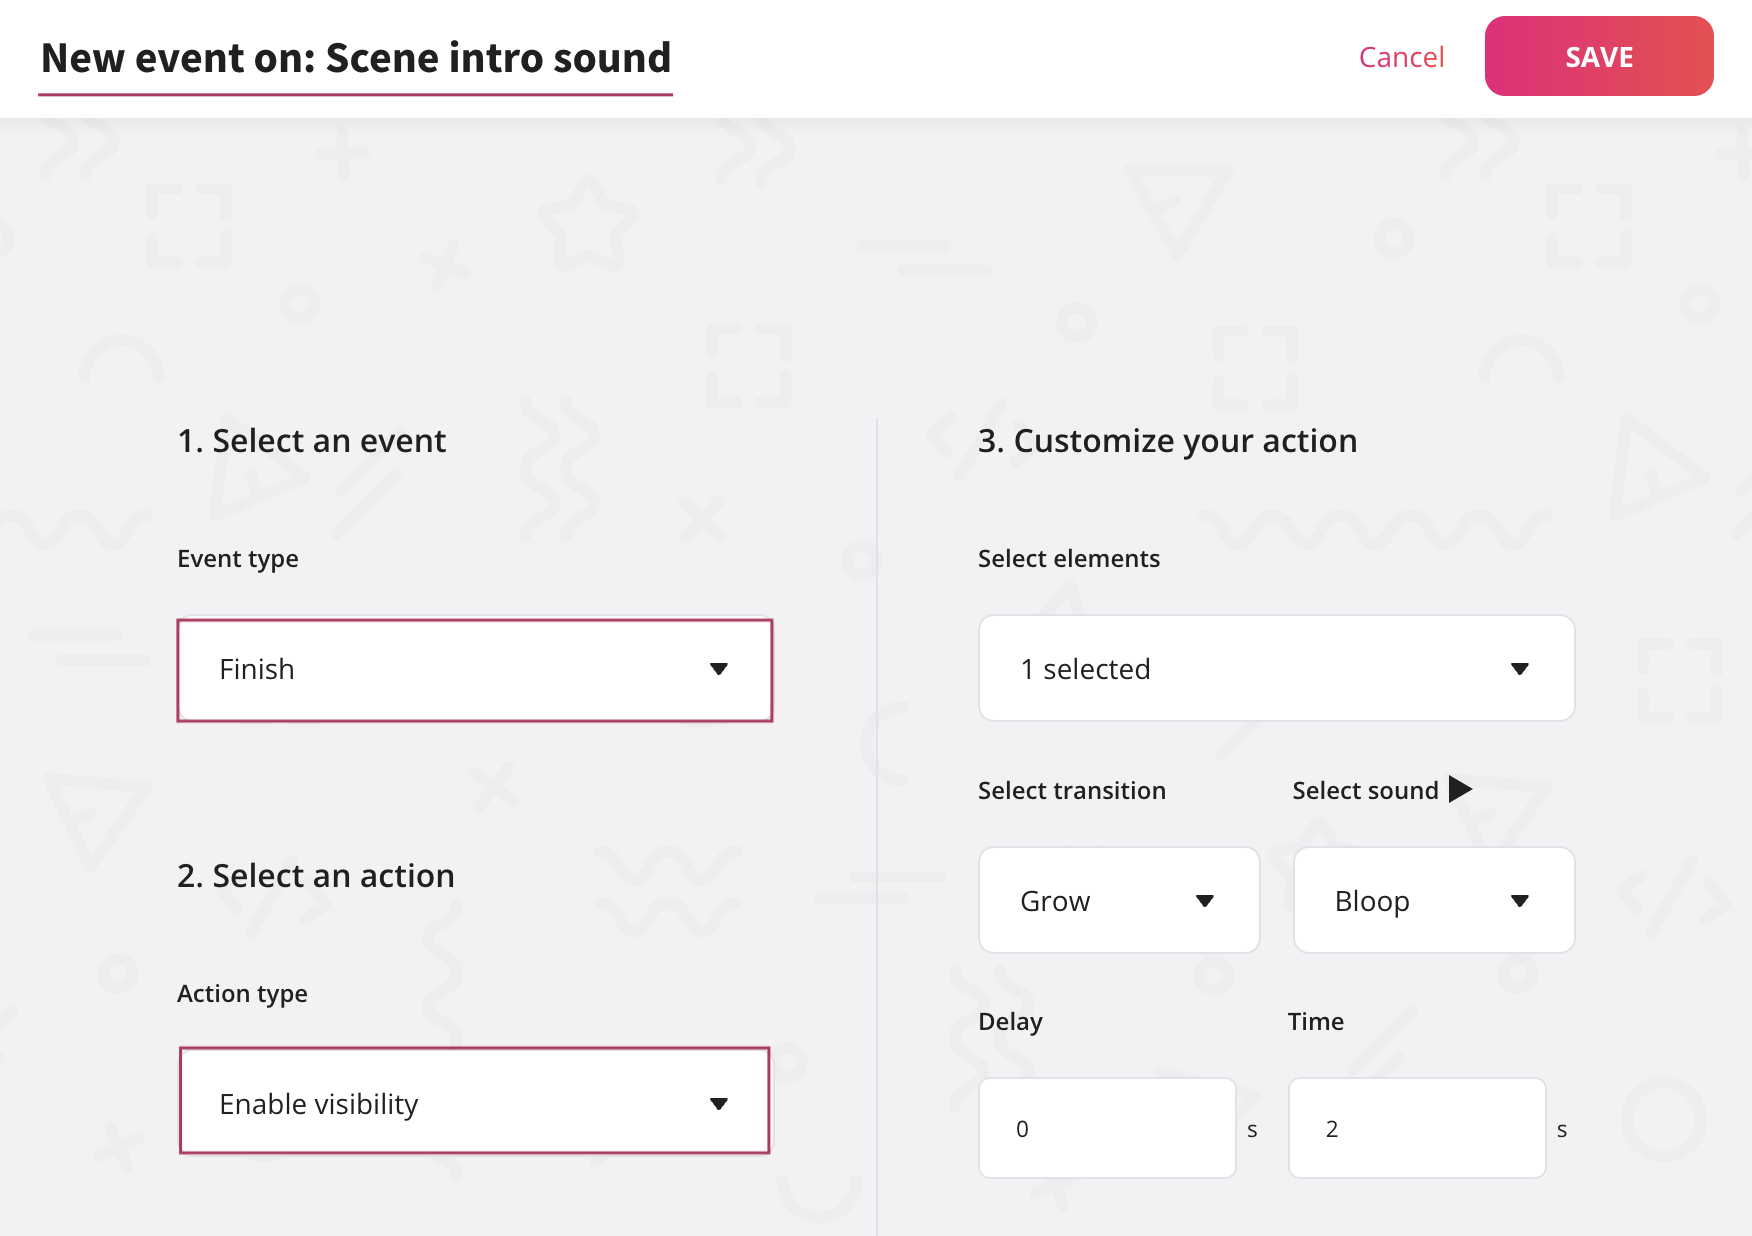
Let's imagine that we have an intro sound of the scene, and that at the end we want the 3D model we are presenting to appear.
- In order to do this we should add a new event to the sound in question ("Scene intro sound").
- We would assign a "finish" event to achieve our goal.
- We would associate an action to fire when this sound finishes, in this case "Enable visibility".
- And we choose the rest of the configuration we want for the effect.
Proximity exit event example
Let's suppose we want to make an access label to the catalogue of this product, the bluetooth speaker, appear on stage, falling from the top of the screen, when the user moves away from the model. That is, we want an event that with the natural "zoom out" of the user, modifies the visibility of a label, with a drop transition. This would basically look something like this example:
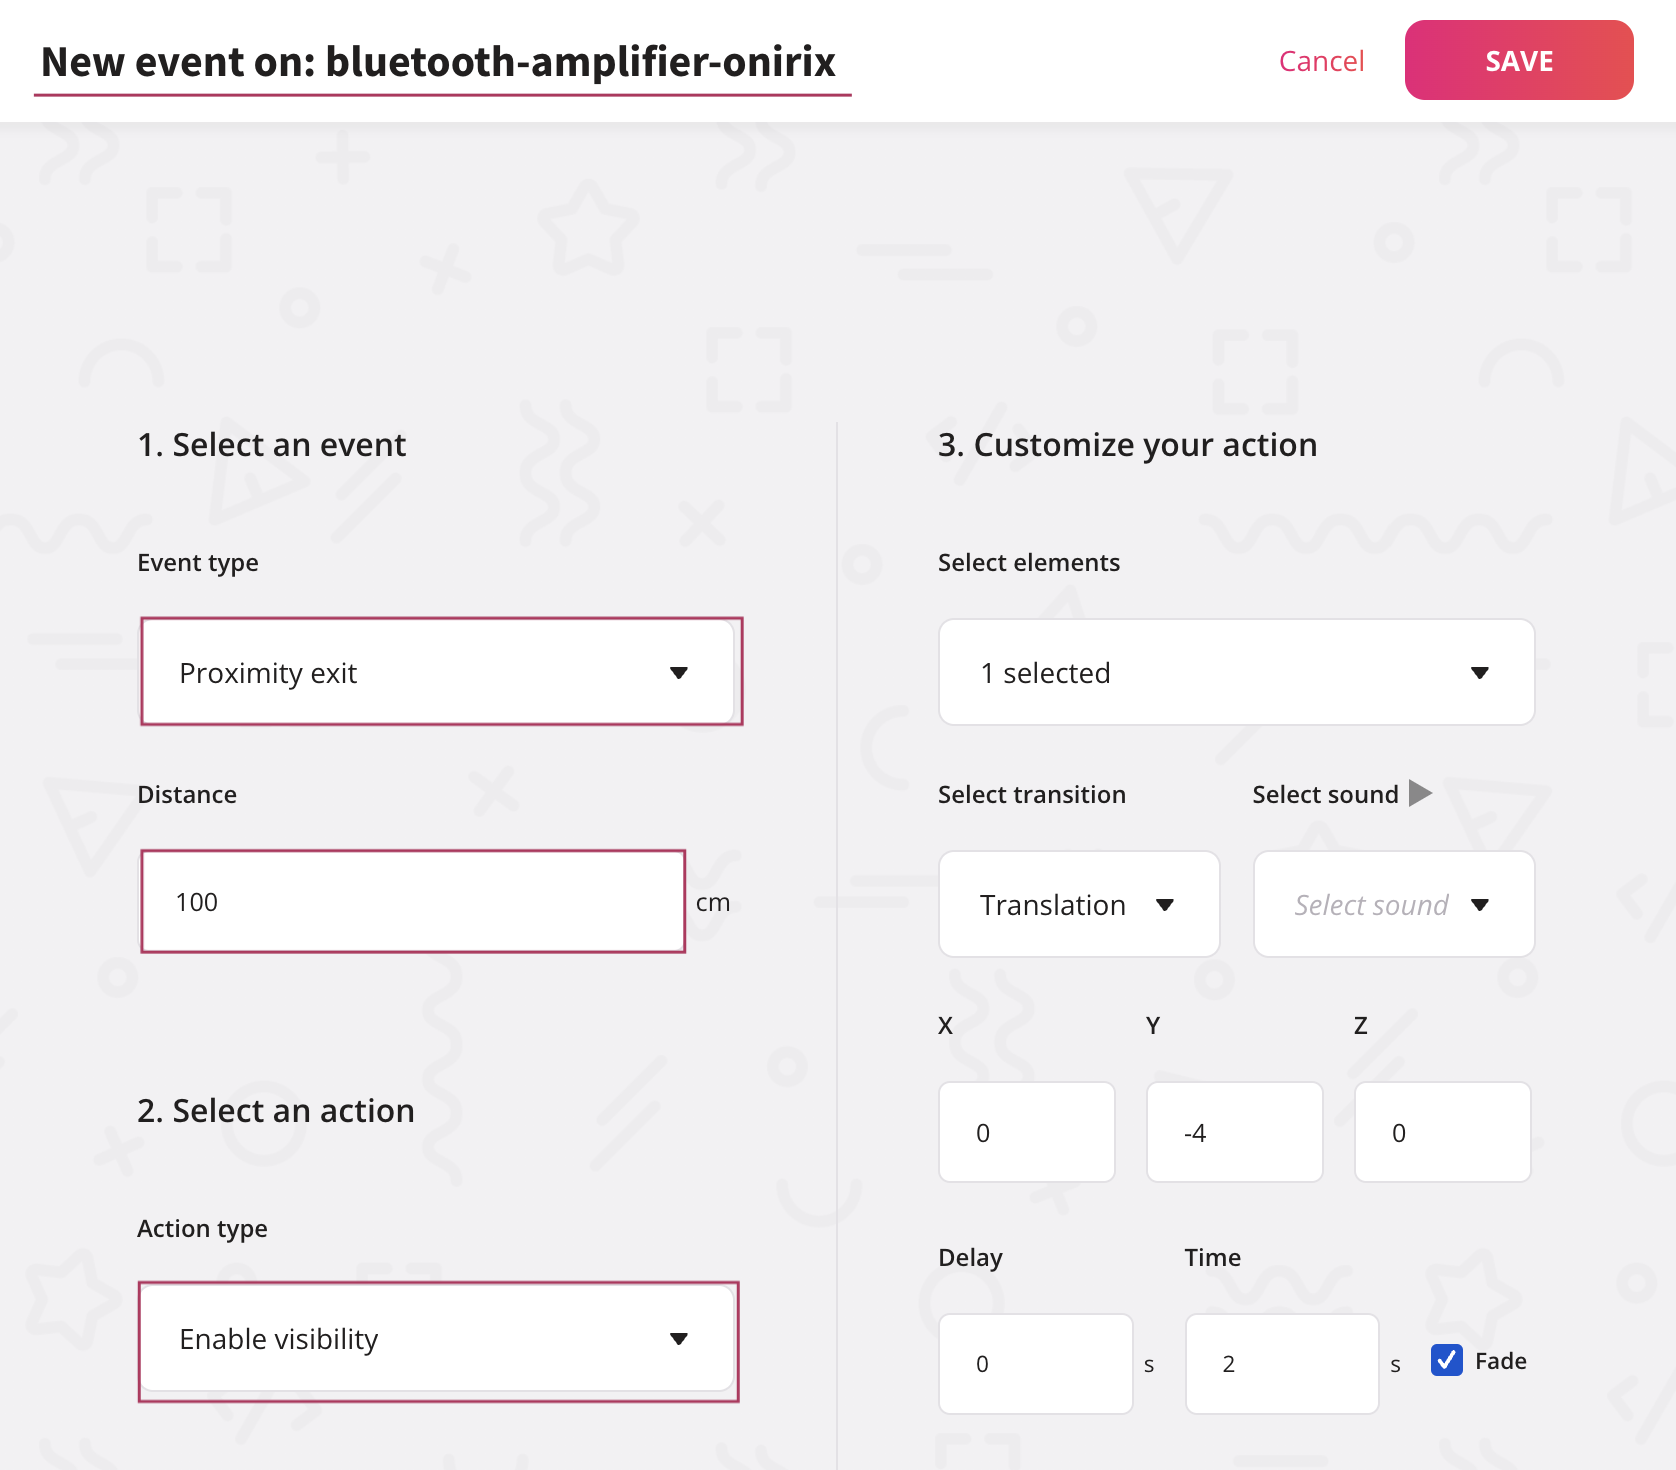
To achieve this, it would be sufficient to add a "proximity exit" event that has an effect on the 3D model, in this case the amplifier. Such an event could have this configuration:
- In this case the element on which we perform the event would be the 3D model of the amplifier.
- The event to select would be the "Proximity exit", which indicates a sufficient zoom out to launch the action.
- As an action we would have an "enable visibility", since what we are looking for is to show the catalogue label.
- We will also add a movement transition, where the Y axis should reflect a fall, so we want to make a -4 in this axis to reach the 0 position.
- This transition will be executed in 2 seconds and will not work as a loop.
About proximity units
For these events to work properly, ensure your scenes are up to scale:
- Image Scenes: If you're using image-based scenes, you should adjust the marker's width and height in the scene properties to match real-world dimensions.
- Surface Scenes:
- Android (using WebXR): The scale will be automatically determined.
- iOS: The scale will be estimated based on the assumption that the chosen surface is located 1 meter below the device. For instance, if you set the trigger at 20cm, but the selected surface is actually 2 meters below the device, the effective trigger distance will become 40cm.
In this document we are giving concrete examples, but obviously with the Onirix event manager you can add as many combinations and nesting between events as you want, to give your experiences a completely personalised interaction.
Actions to be triggered
Here you can find a general list of the actions that can be performed when launching events in Onirix.
Visibility actions
| Action | Description |
|---|---|
| Enable visibility | Makes the selected elements visible |
| Disable visibility | Makes an element not visible |
| Enable all | Makes all elements visible |
| Disable all | Makes all elements not visible |
| Toggle visibility | Makes visible if not visible and not visible if visible |
Video and audio actions
| Action | Description |
|---|---|
| Play | Plays a multimedia element |
| Pause | Pauses a multimedia element. If played again it will continue at the specific paused time |
| Play/Pause | Plays a multimedia element if paused and pauses if playing |
| Stop | Stops and resets a multimedia element |
Modification actions (position, rotation, scale)
| Action | Description |
|---|---|
| Translate | Moves an element a certain distance. The x, y, z values represent the increase (can be negative) on each axis. |
| Translate To | Moves an element to the position of another element. |
| Rotation | Changes the rotation of an element |
| Scale | Change the scale of an element |
Actions for 3D model animations
| Action | Description |
|---|---|
| Play animation | Plays a 3D element animation |
| Stop animation | Stops the selected animation (it can be also "all animations") on a 3D element |
Actions for 3D model variants (switch textures)
| Action | Description |
|---|---|
| Set variant | Changes the variant texture of the 3D element |
Other actions
| Action | Description |
|---|---|
| Launch URL | Launch the URL on the device. Wen can open this new URL in a new tab |
| External API Call | Calls an external API service with the specific URL |
| Reset | Reloads the scene |
| Load Scene | Loads a scene (oid parameter) without reloading the player |
Transitions for visibility modifications
When working with visibility change actions we can add an extra element to the configuration of our events: transitions. In these cases we have a list of varied transitions that allow us to add a movement between the appearance or disappearance of the elements in question.
All available transitions have the same potential parameters, with the exception of the translation transition (seen previously with an example). That is, if we choose a "bounce", a "fade", a "grow", etc.; the possible parameters to use are: sound, delay and time.
- Sounds: we can choose from a list of default sounds, the effect that will be applied to the transition.
- Delay: this is the amount of time to wait between the event taking place and the selected action being performed, initiated by the transition.
- Time: the amount of time the visibility change transition will last until the event is over and finished.
About the sounds, note that if you want to add your own sound effects with a change of visibility, you can do so. It would be as simple as adding a new event that is executed in the same way as the visibility change (in time and form), and assigning a "Play" action to it, choosing as an element the sound previously added to the scene editor.
Translation transition
As we saw in the previous example, in the case of choosing an initial movement transition, we can indicate the amount of movement that the element will undergo to reach its position of origin and modify its visibility.
This is a very useful transition to present new products or interactive elements in a more visual way. It is the only transition to which we can specify the X, Y, Z axis of movement to be executed during the transition Time.
